01 · Getting started
Installation, access rights and menu
Noomina 2.0 is three modules for Odoo 20 Community: base_noomina_20 (the payroll, employee, recruitment and portal core), noomina_spain (Spanish payroll concepts, indicators and template) and web_noomina20 (the public product page). The core builds on the standard Employees and Attendances apps, which are installed automatically as dependencies.
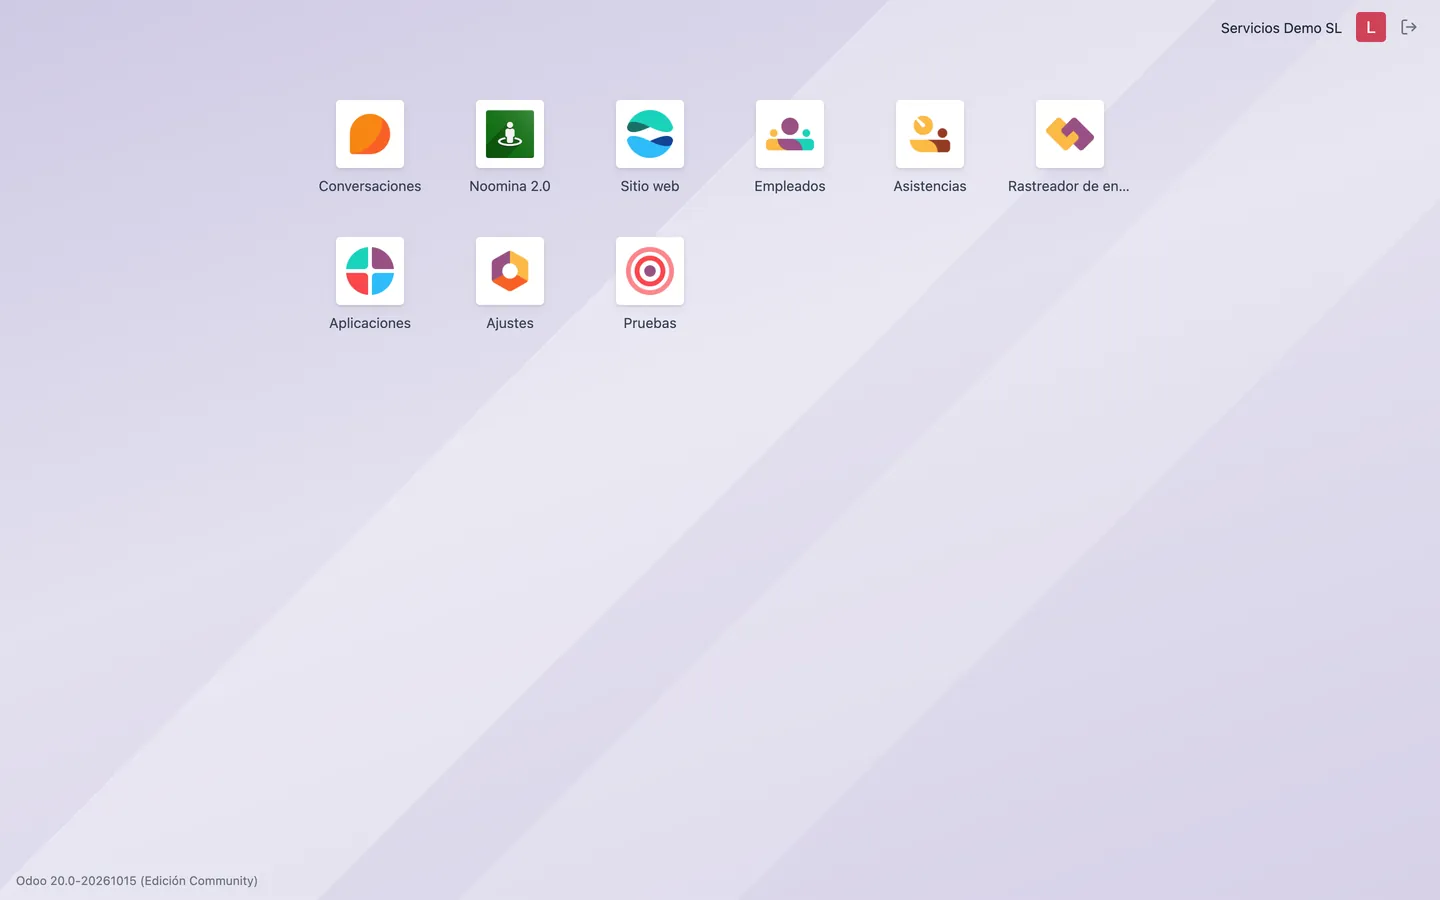
- 1Copy the base_noomina_20 and noomina_spain folders into the addons path of your Odoo 20, update the apps list and install «Noomina Spain MFH» (it also installs the base).
- 2In Settings → Users, open each user and pick a level in the «Noomina 2.0» section: User (reads master data and manages payrolls, absences and documents), Payroll Batch Approver (can also approve batch runs) or Administrator (everything, including deleting and configuring). The Odoo administrator gets the Administrator level on install.
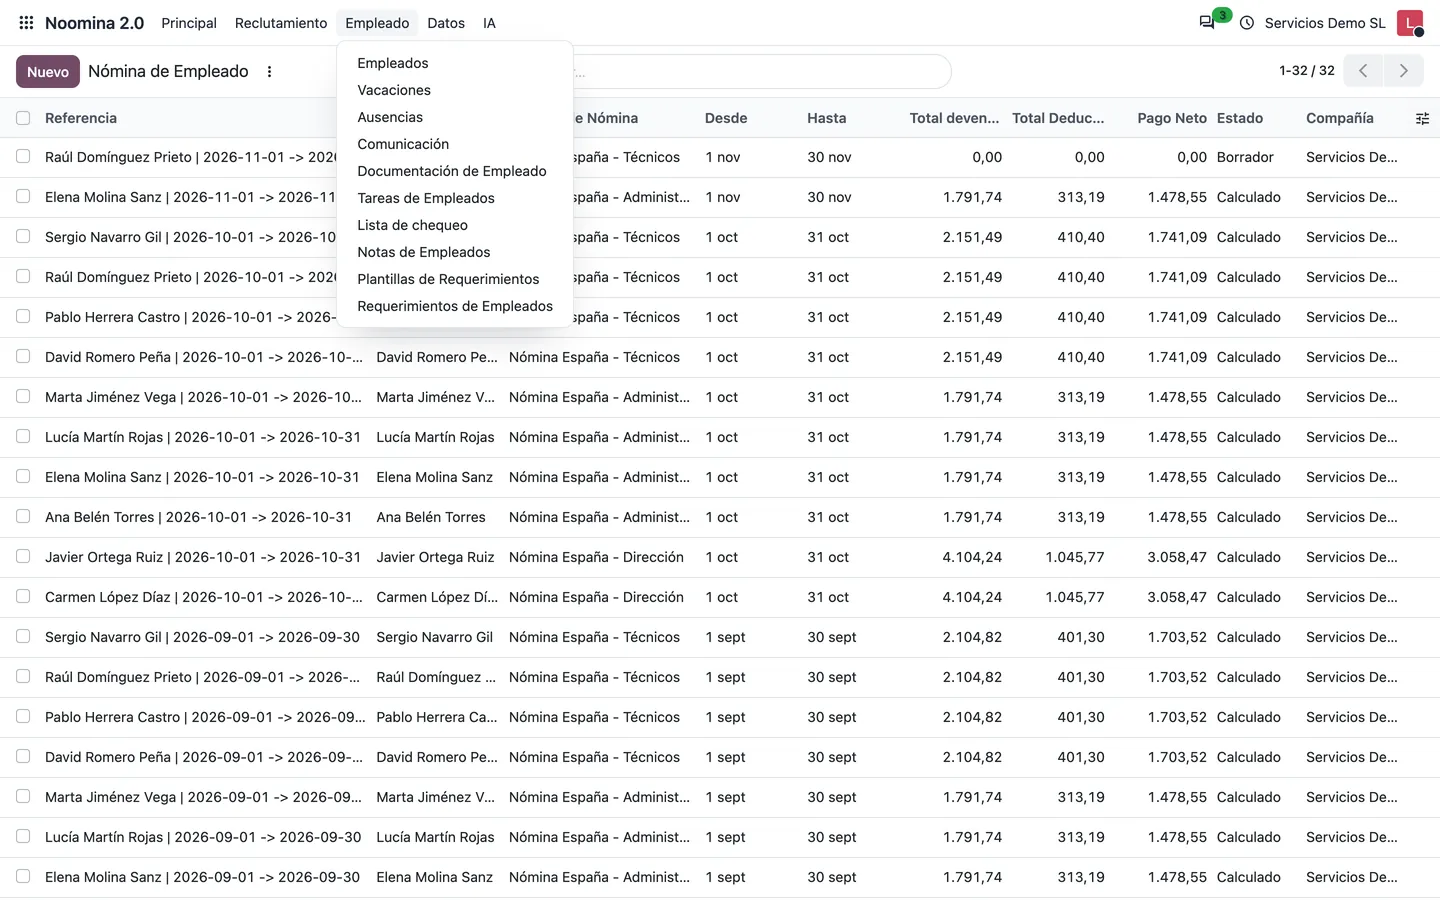
- 3Open the Noomina 2.0 app. Its menu has Main (Employee Payroll and Payroll Batch Run), Recruitment (Job Positions and Job Applications), Employee (employees, vacations, absences, communication, documentation, tasks, checklists, notes and requirements), Data (concepts, templates, indicators and lookup tables) and AI (Configuration).
- 4Install the Spanish language in Settings → Languages: the module texts, the concepts and the included data types are translated into Spanish.
Tip: A user without any Noomina 2.0 level does not see the app: give at least «User» to whoever prepares payrolls.
02 · Getting started
The employee form
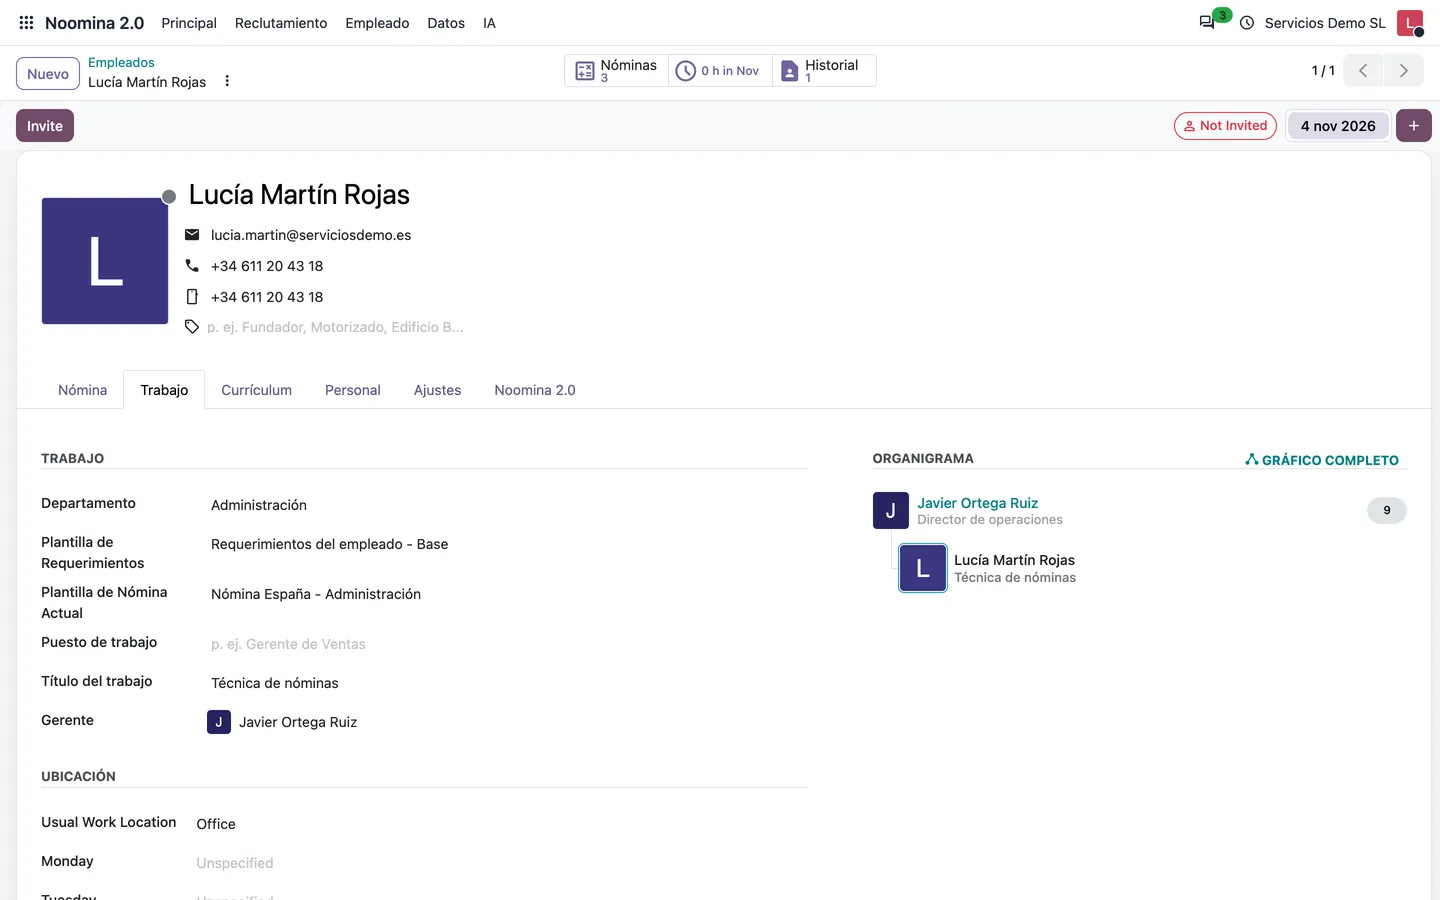
Noomina 2.0 works on the standard Odoo employees and adds what payroll needs: the payroll template applied to them, the document template they must hand in, and the employee portal user and password.
- 1Go to Noomina 2.0 → Employee → Employees and open or create an employee (name, job, department, work email and their ID number in «Identification No», printed on the payslip).
- 2In the «Work» tab, below «Department», choose the «Requirement Template» (it automatically creates their document requirements) and the «Current Payroll Template» (used by batch runs).
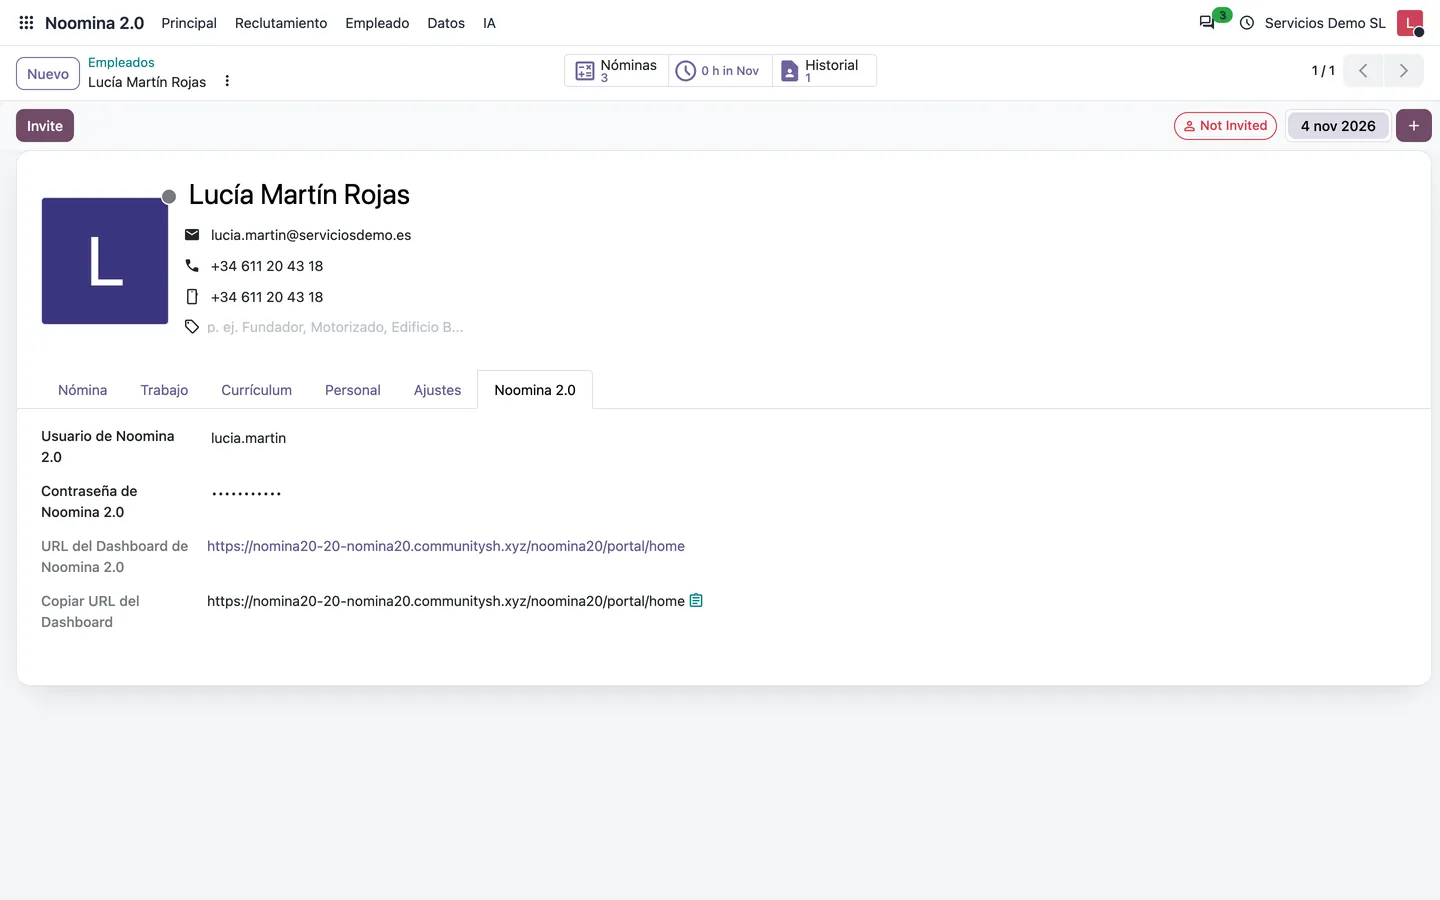
- 3In the «Noomina 2.0» tab enter the «Noomina 2.0 User» (unique per employee) and the «Noomina 2.0 Password». The «Noomina 2.0 Dashboard URL» field and the «Copy Dashboard URL» button give you the portal link to send them.
- 4The «Payrolls» smart button in the header shows how many payrolls the employee has and opens their list, with the employee and template prefilled to create a new one.
03 · Payroll data
Concepts
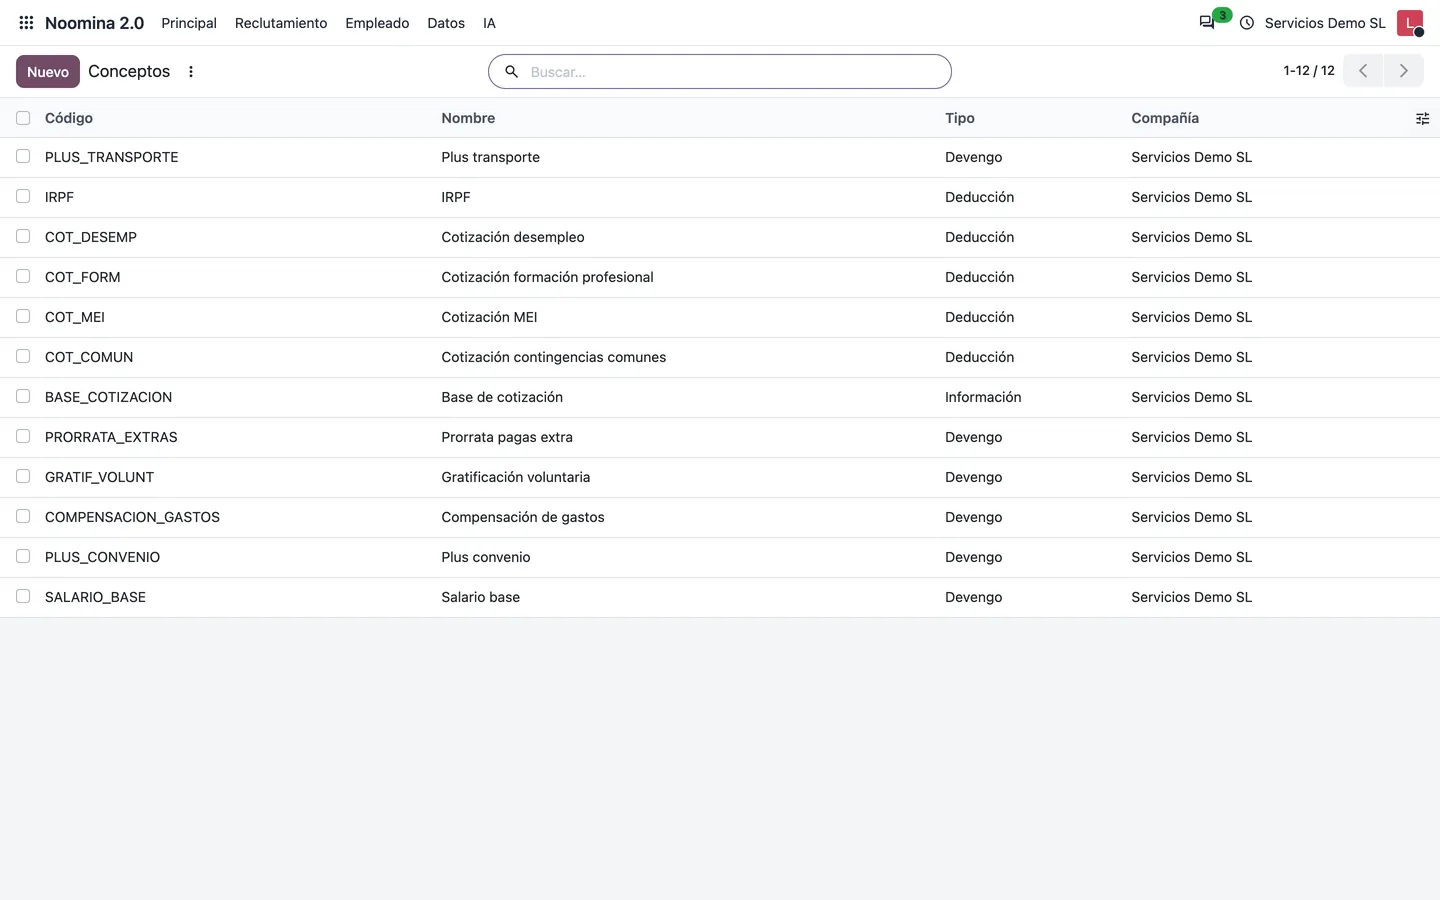
A concept is each line of the payslip: base salary, allowances, contributions, income tax… Its code is also the variable name formulas use to read the amount once it is calculated.
- 1Go to Noomina 2.0 → Data → Concepts and click «New».
- 2Enter the «Code» in capitals and without spaces (for example TRANSPORT_ALLOWANCE) and the «Name» printed on the payslip.
- 3Choose the «Type»: Earning (adds to Total Earnings), Deduction (adds to Total Deductions) or Info (calculated and shown, but it does not change net pay, like the contribution base).
- 4Save. The code must be unique within the company.
04 · Payroll data
Indicators and dated values
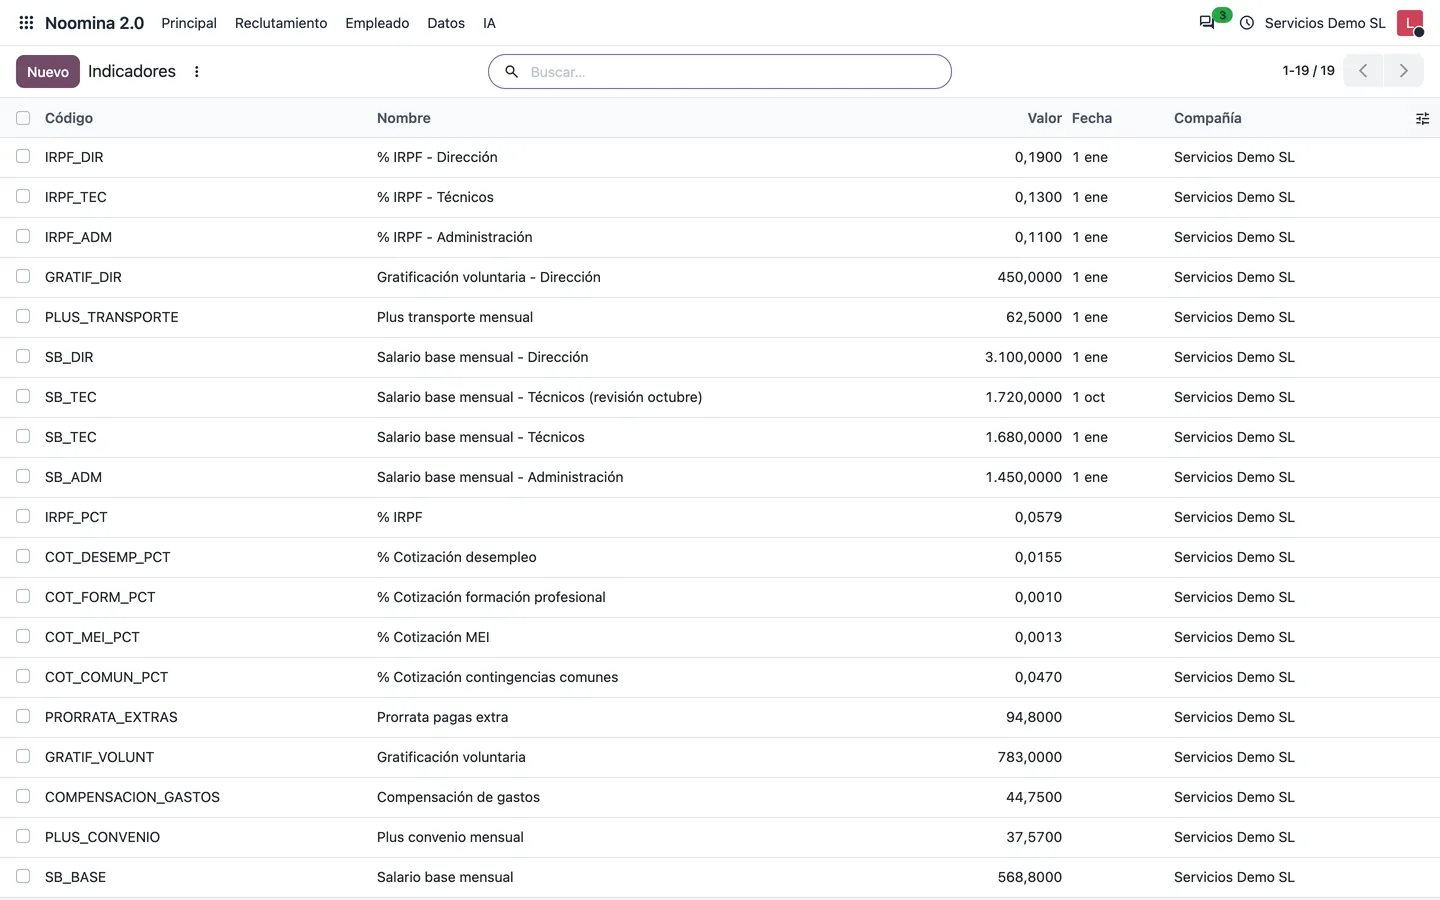
Indicators are the values formulas feed on: base salaries per category, contribution rates, income tax, allowances… Each has a code, a value and optionally a date from which it applies.
- 1Go to Noomina 2.0 → Data → Indicators and click «New».
- 2Enter the «Code» (for example SB_TEC), the «Name» and the «Value». Rates are stored as fractions: 4.70% is 0.047.
- 3For a pay rise do not edit the old value: create another indicator with the same code, the new value and the effective «Date» (for example 10/01/2026).
- 4When a payroll is calculated, each code takes the value with the latest date not after the payroll's «To» date; an undated value is used when there is no valid dated one.
Tip: This way old payrolls can be recalculated with the values of their period: in the demo, technicians earn €1,680 until September and €1,720 from October with the same SB_TEC code.
05 · Payroll data
Payroll templates and formulas
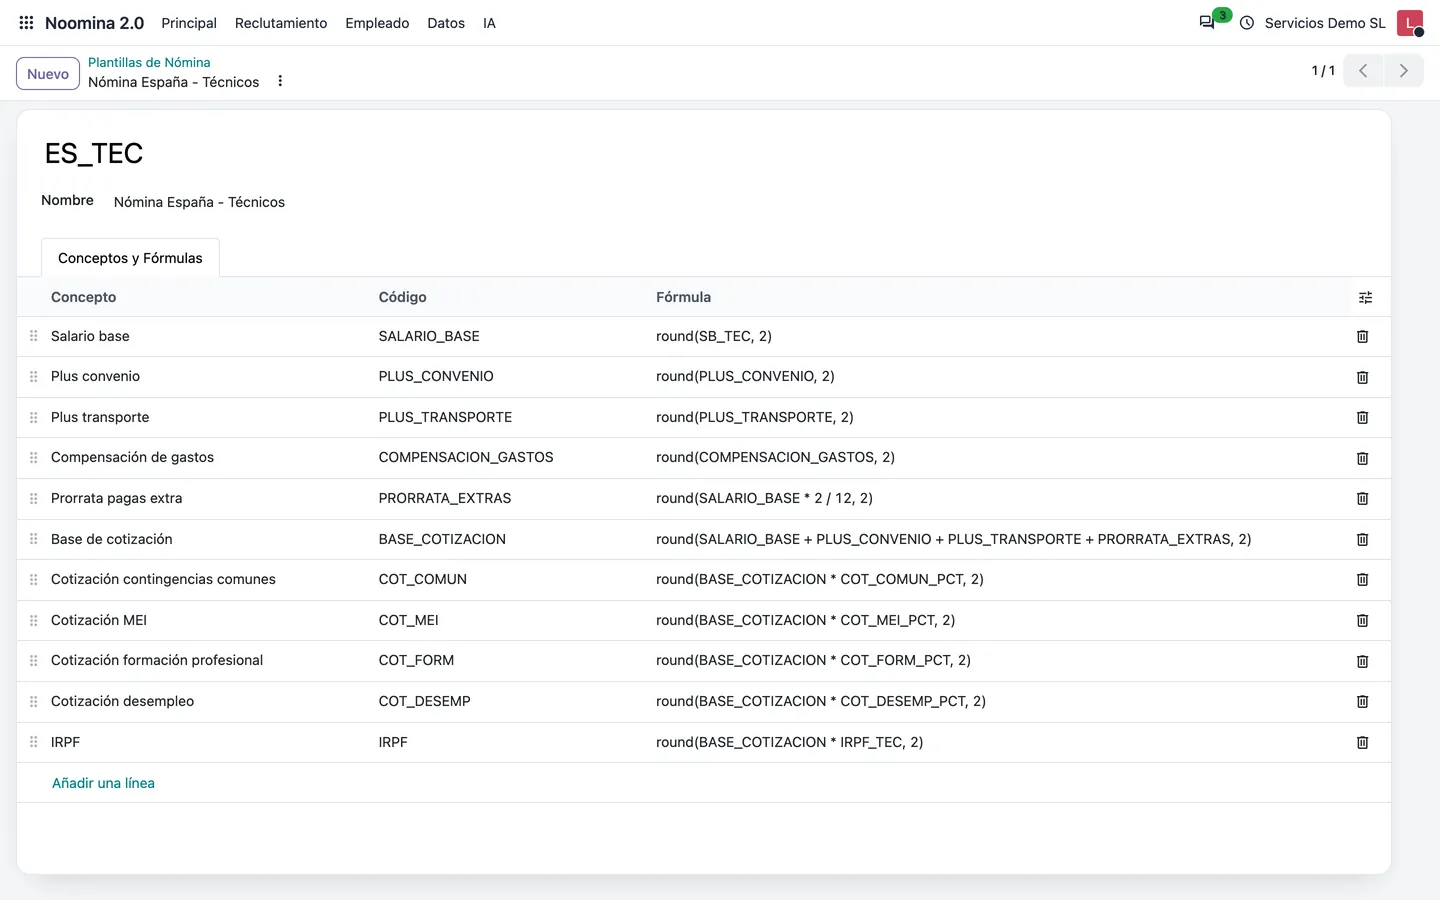
A payroll template is the ordered list of concepts calculated for a group of employees, each with its Python formula. The usual setup is one template per category or collective agreement.
- 1Go to Noomina 2.0 → Data → Payroll Templates and click «New»; enter a unique «Code» and the «Name».
- 2In the concept list add one line per concept, in calculation order (drag the handle to reorder). Each concept can appear only once.
- 3Write the «Formula»: you can use indicator codes, the codes of concepts already calculated in earlier lines and the round, min, max and abs functions. Examples: round(SB_TEC, 2), round(SALARIO_BASE * 2 / 12, 2), round(BASE_COTIZACION * IRPF_TEC, 2).
- 4Assign the template to employees on their form («Current Payroll Template»).
Tip: If a formula has an error (a misspelt code, for example), calculating shows a warning with the concept name and the error, and the payroll is left unchanged.
06 · Payroll data
Spanish localisation (noomina_spain)
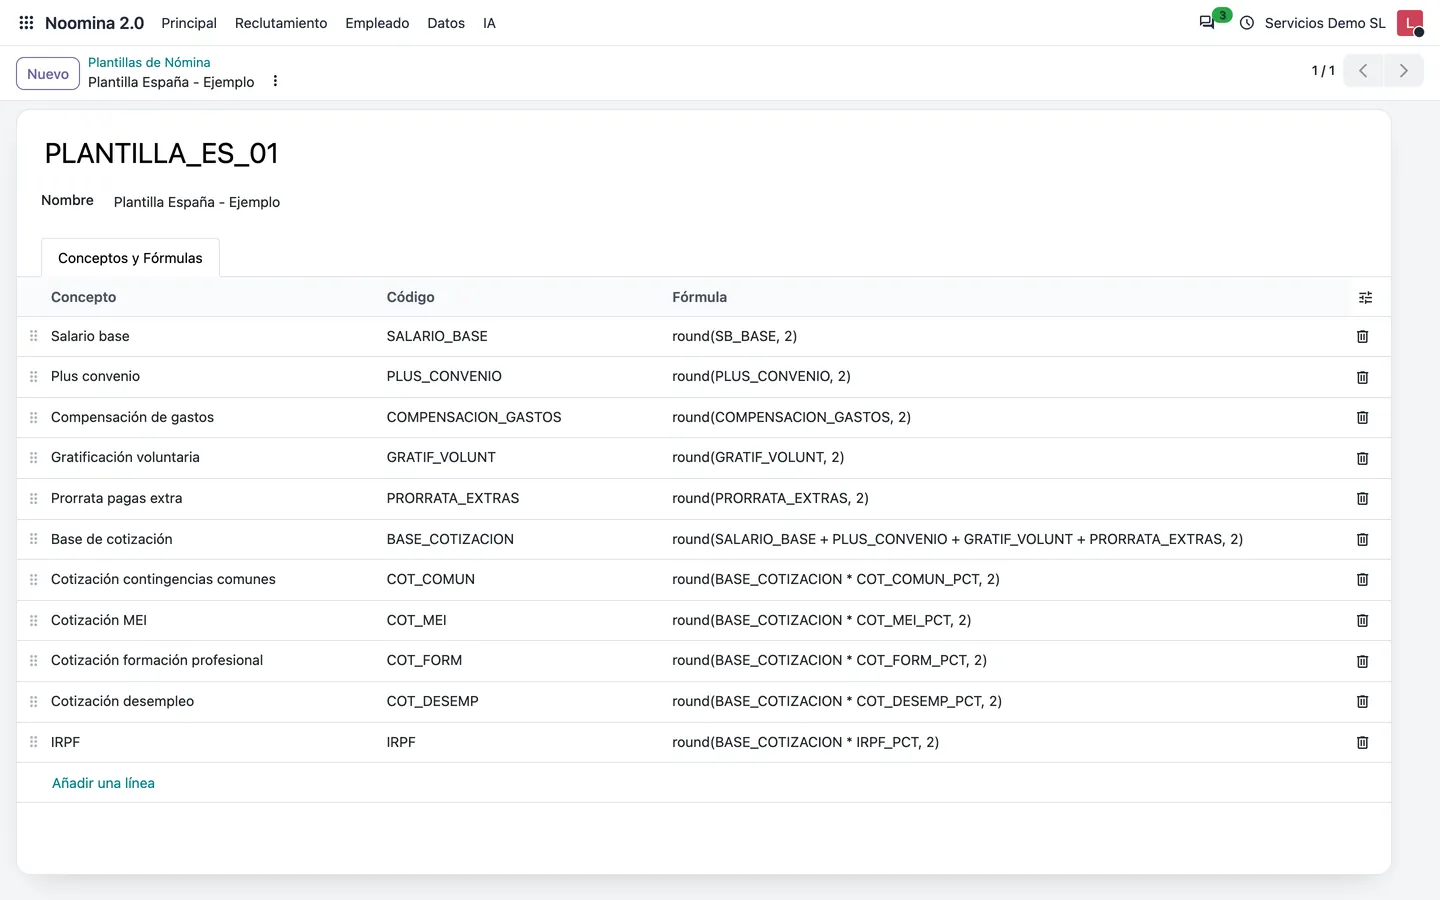
The noomina_spain module loads what a Spanish payroll needs: salary and Social Security contribution indicators (common contingencies, MEI, vocational training and unemployment) and income tax (IRPF), the matching concepts and the «Spain Template - Example» template.
- 1Install «Noomina Spain MFH». Data → Indicators then shows SB_BASE, PLUS_CONVENIO, COMPENSACION_GASTOS, GRATIF_VOLUNT, PRORRATA_EXTRAS, COT_COMUN_PCT, COT_MEI_PCT, COT_FORM_PCT, COT_DESEMP_PCT and IRPF_PCT.
- 2Check the rates and the salary against your collective agreement and the current year; they are sample values.
- 3Open Data → Payroll Templates → «Spain Template - Example»: it adds the earnings into BASE_COTIZACION (Info type) and calculates each contribution and the income tax on it.
- 4Duplicate the template (⋮ menu next to the title → Duplicate) to create one per category, change the code and point the formulas to their own indicators (for example SB_ADM and IRPF_ADM).
Tip: noomina_spain data is not overwritten when the module is updated, so you can adjust its values safely.
07 · Payroll data
Lookup tables and company documentation
The Data menu also holds the lists used across the app and the documents the company shares with all staff on the portal.
- 1In Data → Absence Types, Communication Categories and Employee Document Types create the values you need (the module ships Sickness; Suggestion, Issue and Improvement; ID Card and Labor Contract). Untick «Active» to retire one without deleting it.
- 2In Data → Checklist Tasks create the reusable tasks (name and description) you will later add to checklists.
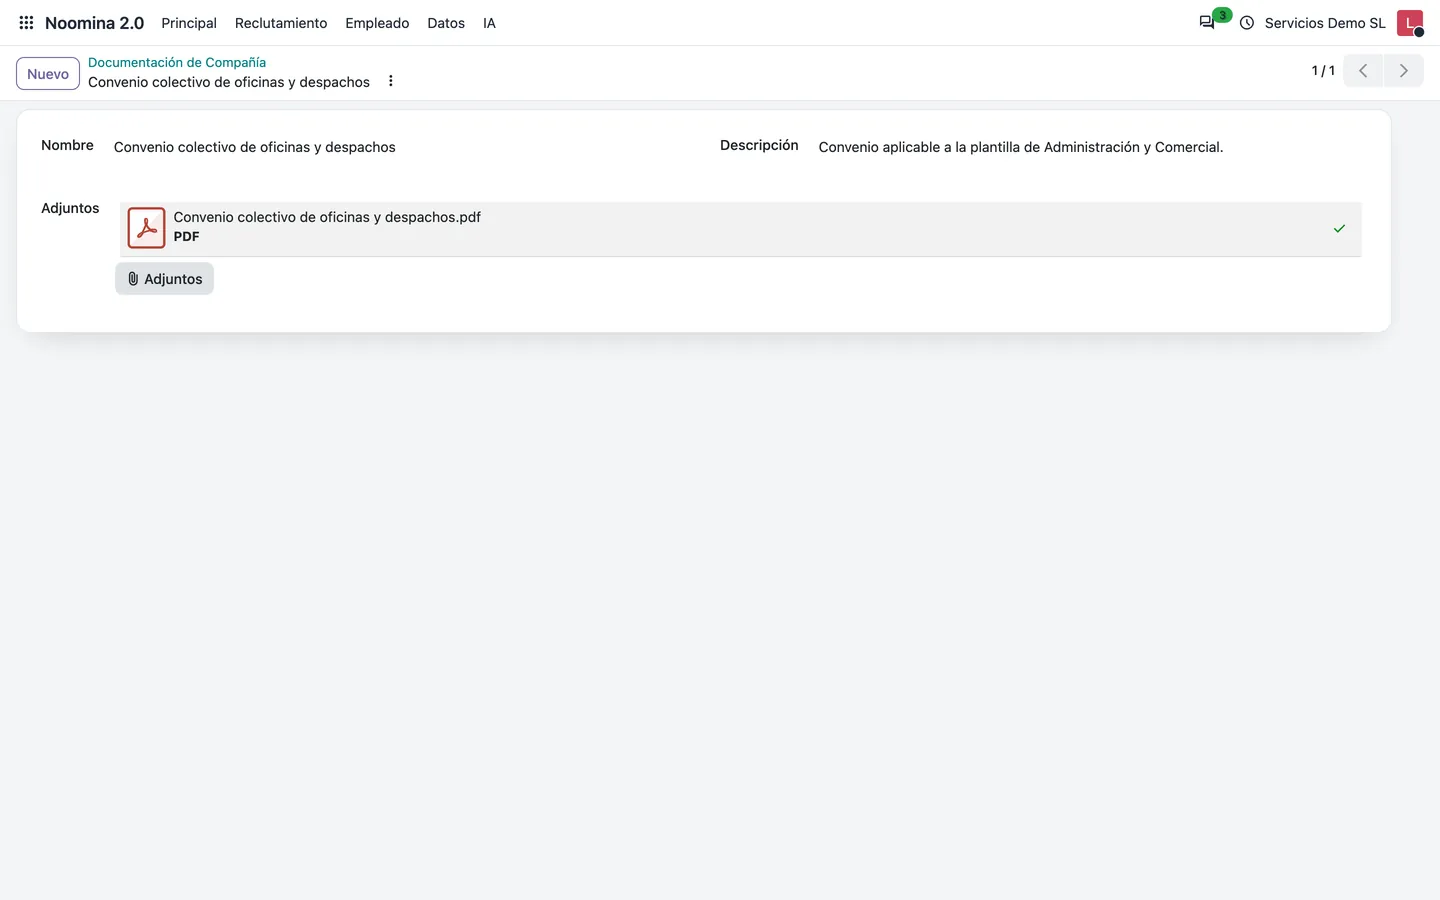
- 3In Data → Company Documentation click «New», enter the «Name» and «Description» and upload one or more files in «Attachments» (collective agreement, work calendar, welcome guide…).
- 4Company documents appear on the portal, under «Company Documents», for every employee of that company, who can download them.
08 · Payroll
Calculating a payroll and its PDF payslip
An employee payroll is a template calculated for one employee and one period. You can create them one by one, as here, or in bulk with batch runs.
- 1Go to Noomina 2.0 → Main → Employee Payroll and click «New».
- 2Pick the «Employee»: their «Payroll Template» and company are filled in. Enter «From» and «To» (the period; «To» decides which indicator values are used).
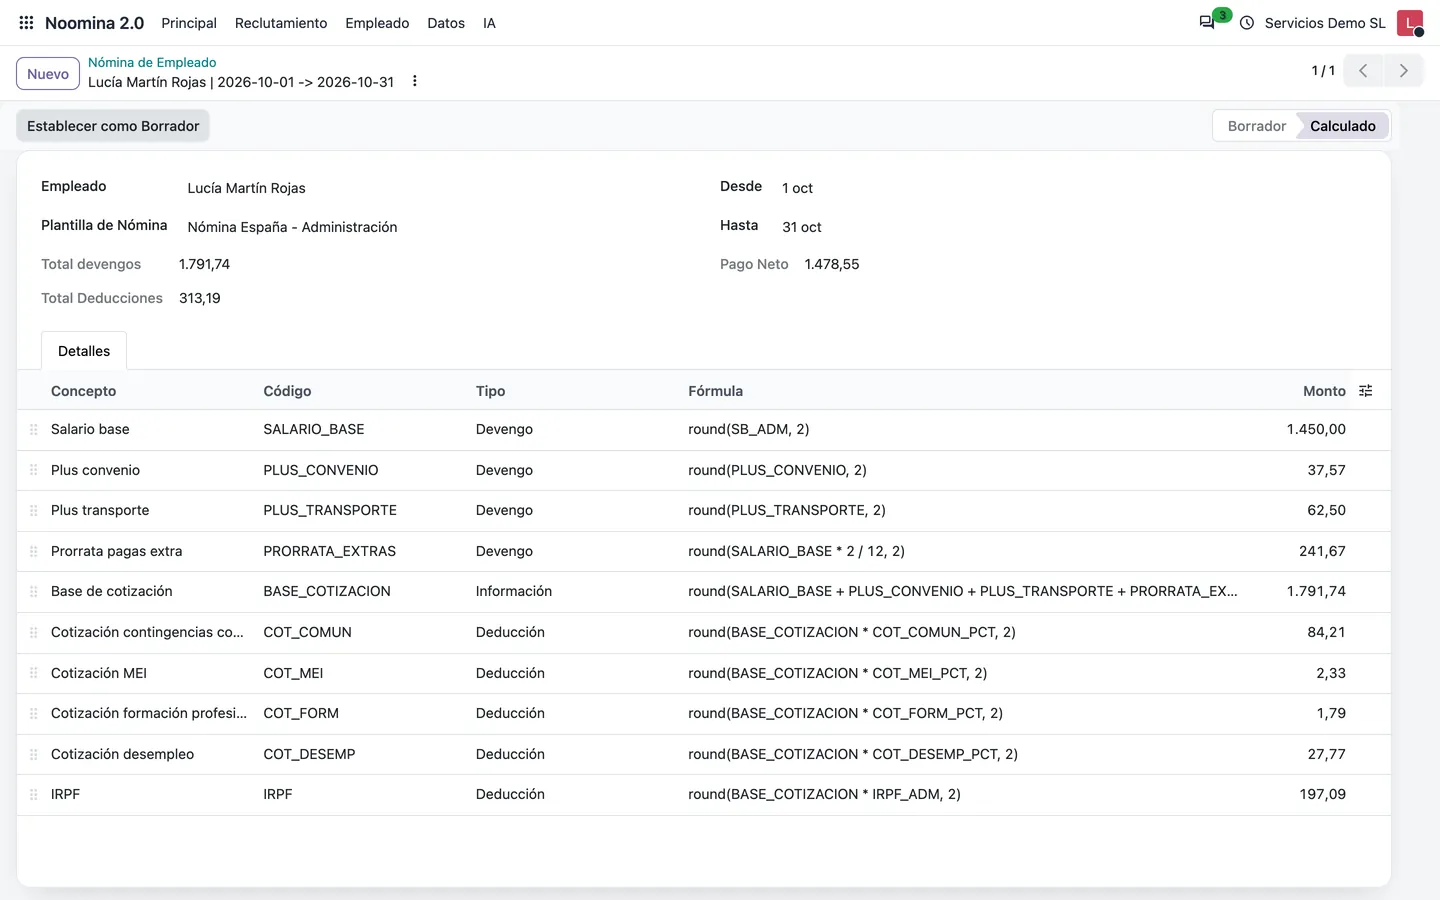
- 3Click «Calculate»: previous lines are removed, the formulas run in order and the «Details» tab shows each concept with code, type, formula and amount. The payroll becomes Calculated with its Total Earnings, Total Deductions and Net Pay.
- 4If you change an indicator or the template, click «Set to Draft» and «Calculate» again.
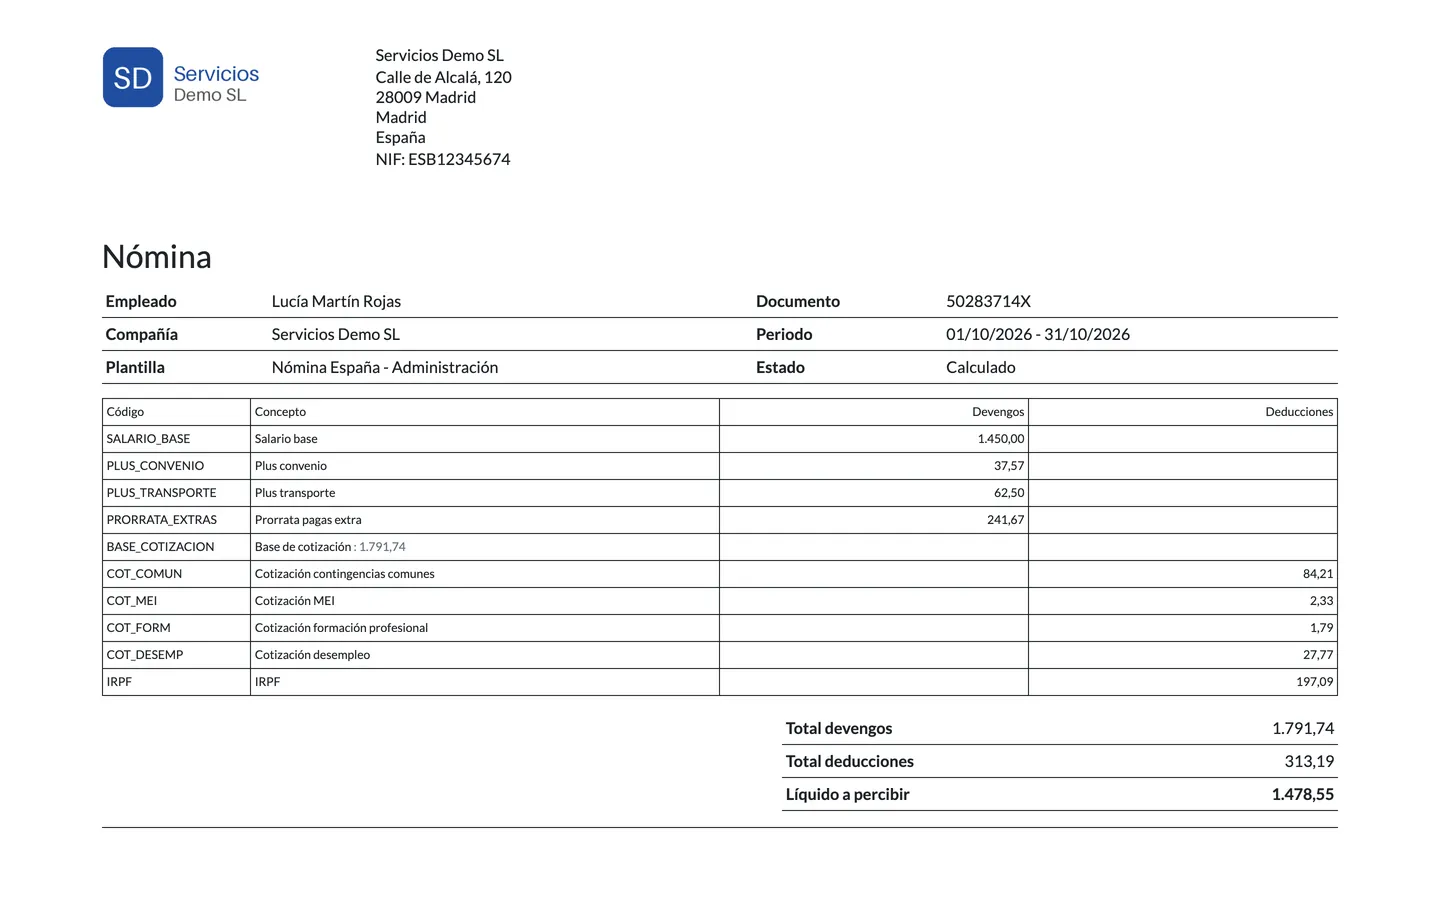
- 5For the payslip, open the ⋮ menu next to the title → Print → «Employee Payroll»: a PDF with the company details, the employee, their ID number, the period and the earnings and deductions.
Tip: Info concepts (like the contribution base) are printed next to the concept name, without adding to earnings or deductions.
09 · Payroll
Batch runs: load and execute
A batch run calculates the payrolls of one period for many employees at once. Each employee uses the template assigned on their form.
- 1Go to Noomina 2.0 → Main → Payroll Batch Run, click «New» and enter «From» and «To».
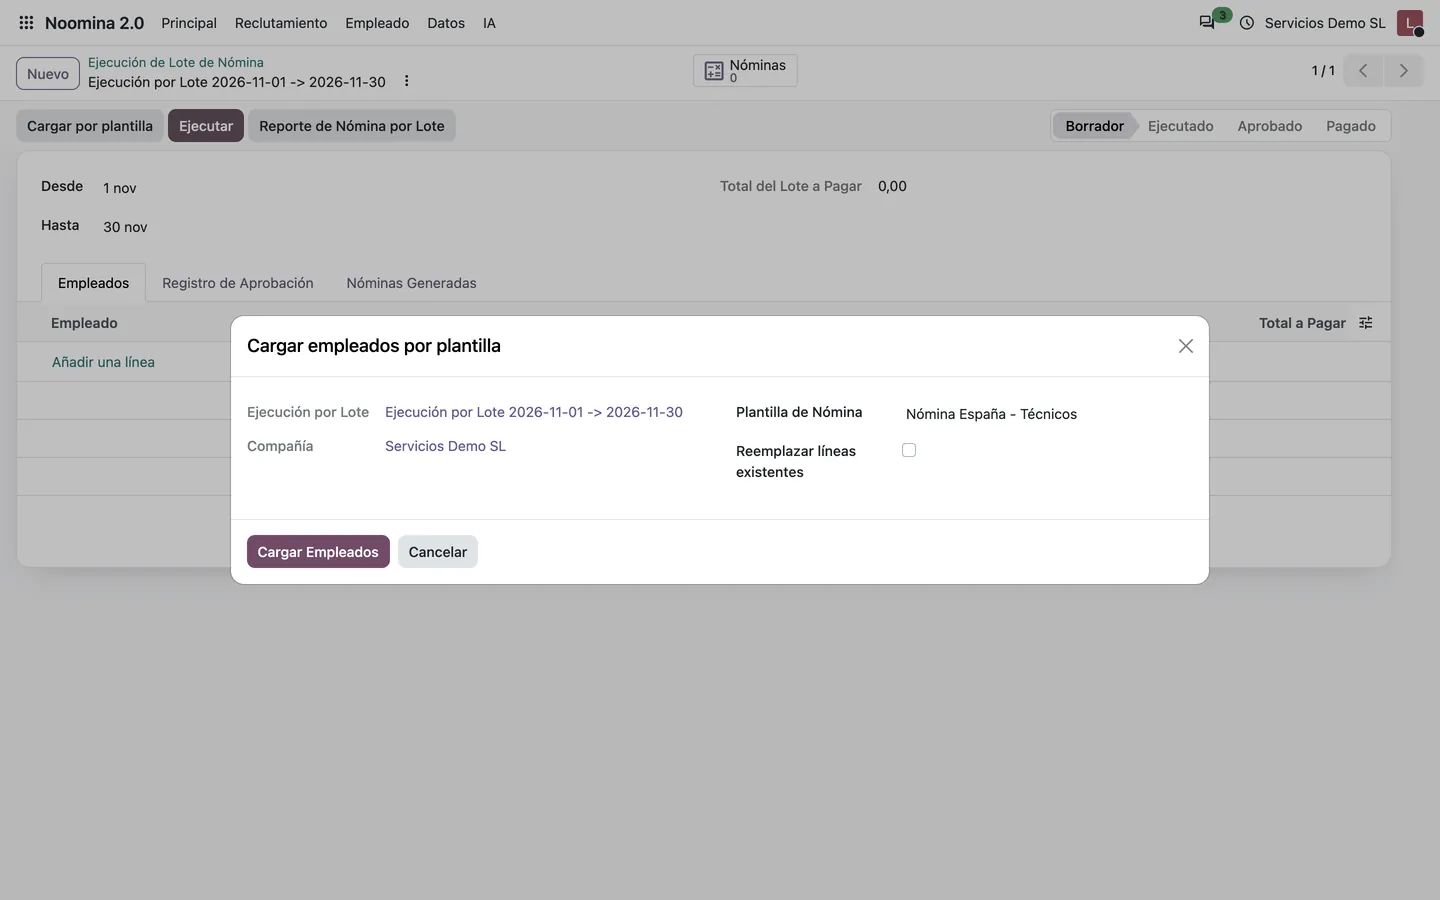
- 2Click «Load by Template», choose the «Payroll Template» and click «Load Employees»: the company employees with that template are added. Repeat for each template. Tick «Replace existing lines» to empty the list first.
- 3You can also add or remove employees by hand in the «Employees» tab (an employee can appear only once in the batch).
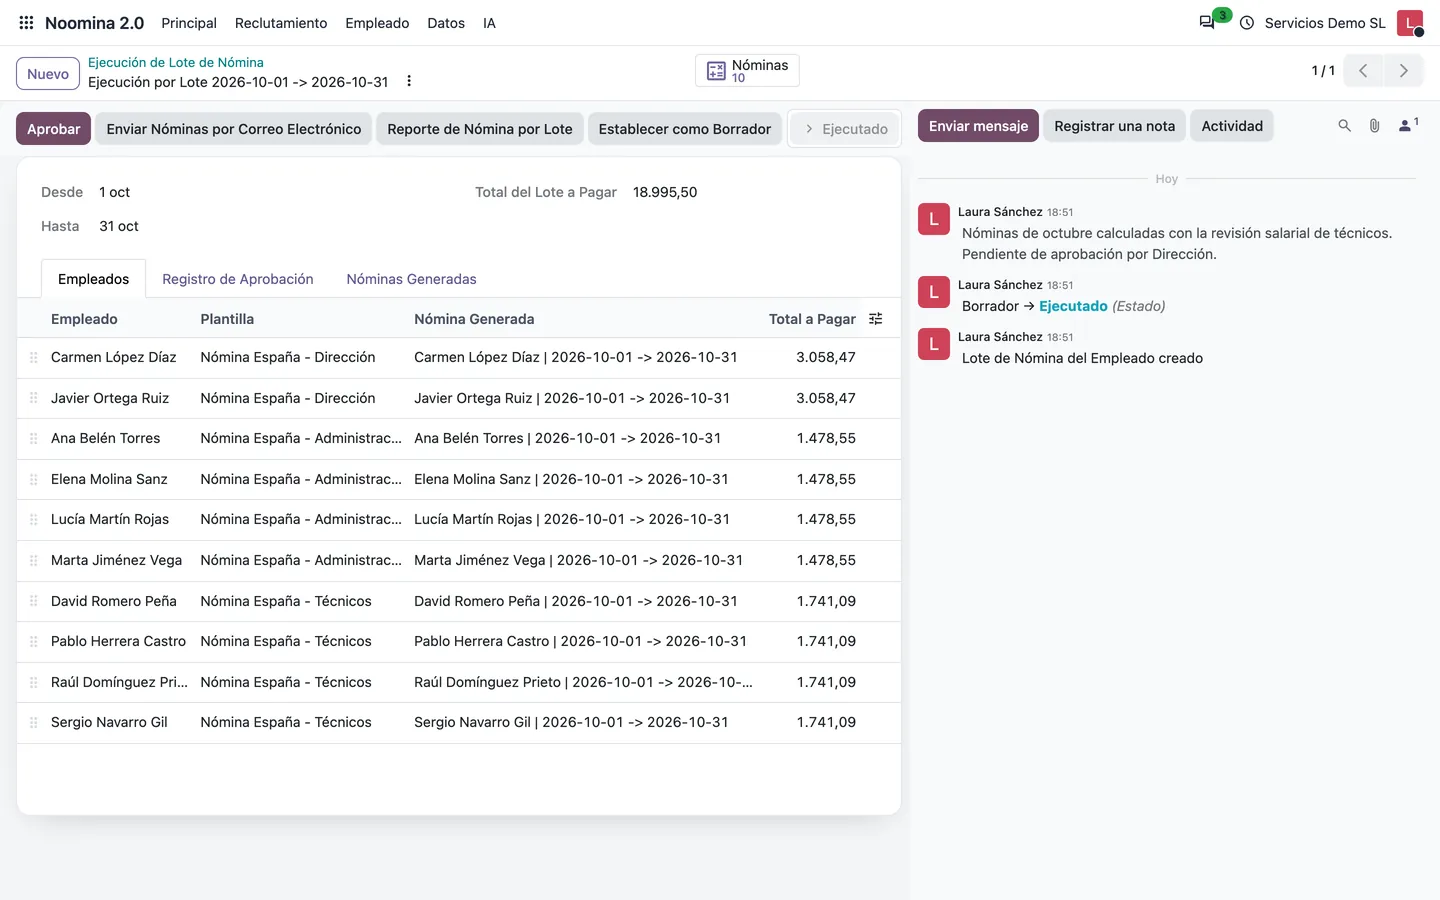
- 4Click «Execute»: one payroll per employee is created and calculated, the batch becomes Executed and the list of generated payrolls opens. Each line shows its «Generated Payroll» and «Total to Pay»; at the top, «Total Batch to Pay» adds up the net amounts.
Tip: If any employee in the batch has no template assigned, execution stops and lists their names: assign them a template and execute again.
10 · Payroll
Approval, payment, Excel and e-mail
An executed batch follows Draft → Executed → Approved → Paid. From the batch you can also download the Excel summary and e-mail each employee their payslip.
- 1A user with the Payroll Batch Approver or Administrator level clicks «Approve»: the batch becomes Approved and the «Approval Log» tab records who approved it and when.
- 2Once the bank has paid, click «Mark as Paid».
- 3«Batch Payroll Report» downloads an Excel file with one row per employee, one column per concept and the earnings, deductions and net totals.
- 4«Send Payrolls by Email» renders each payroll PDF and sends it to the employee's work email (or their user's email, or the private one). The batch chatter records how many were sent and which employees have no email.
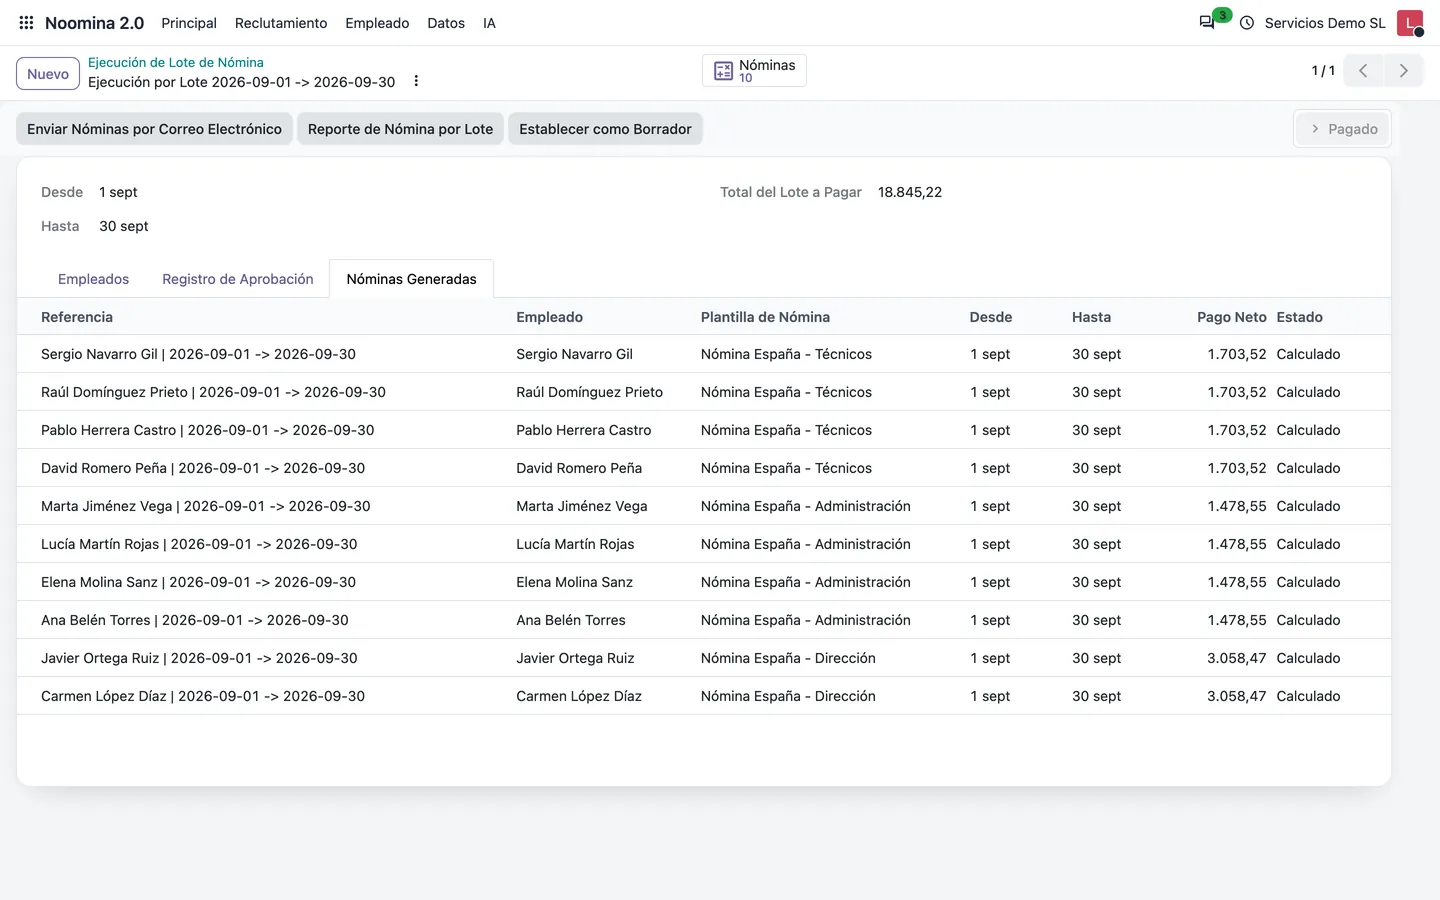
- 5The «Payrolls» smart button and the «Generated Payrolls» tab show the batch payrolls.
Tip: «Set to Draft» returns the batch to draft and clears the approval log, but not the payrolls already generated: if you will execute it again, delete those payrolls first so they are not duplicated.
11 · Employees
Absences and vacations
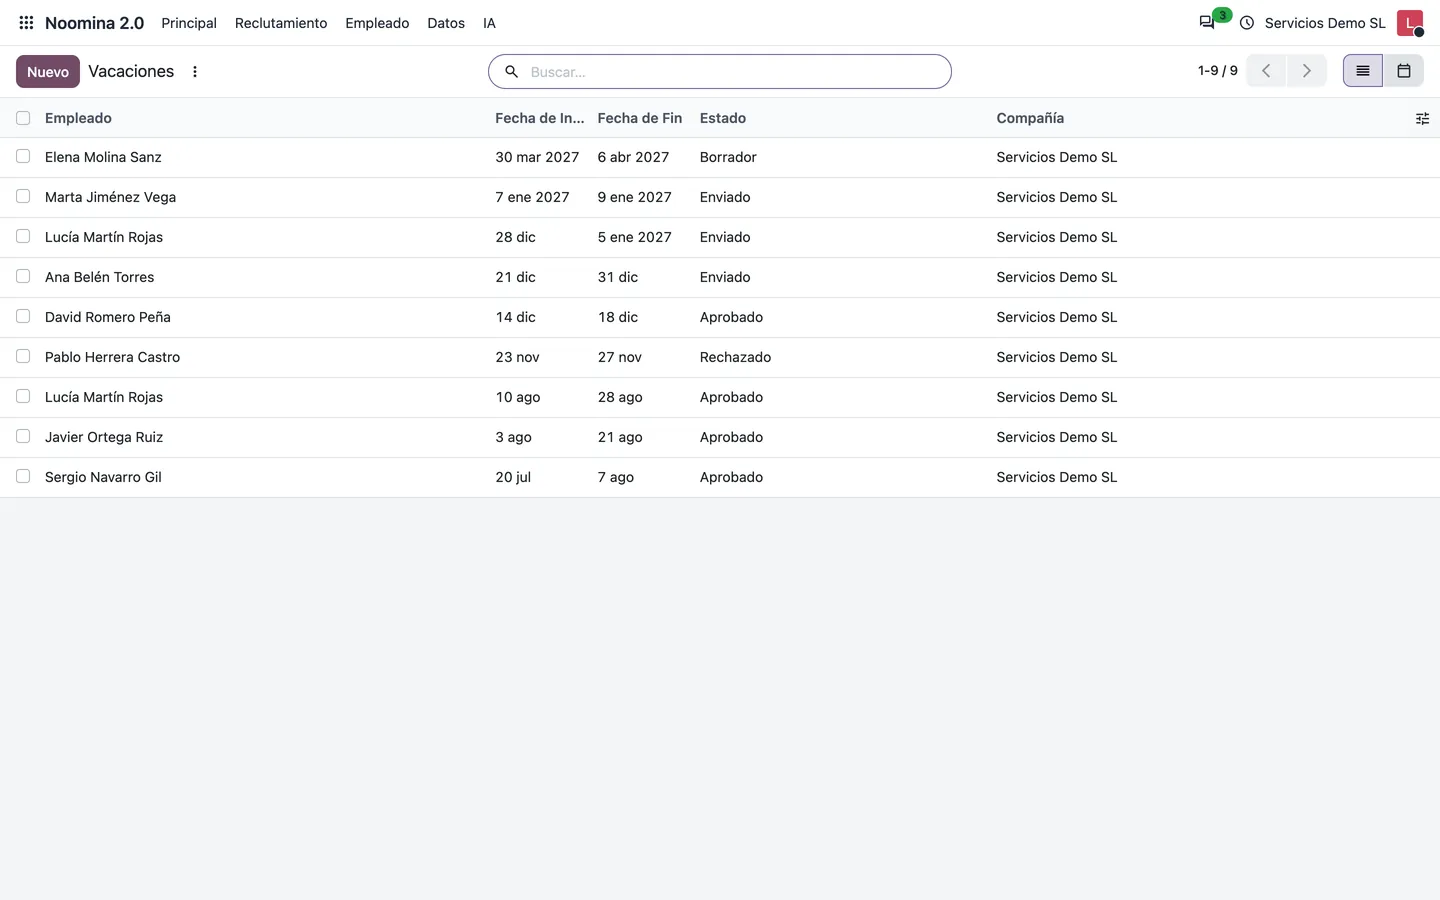
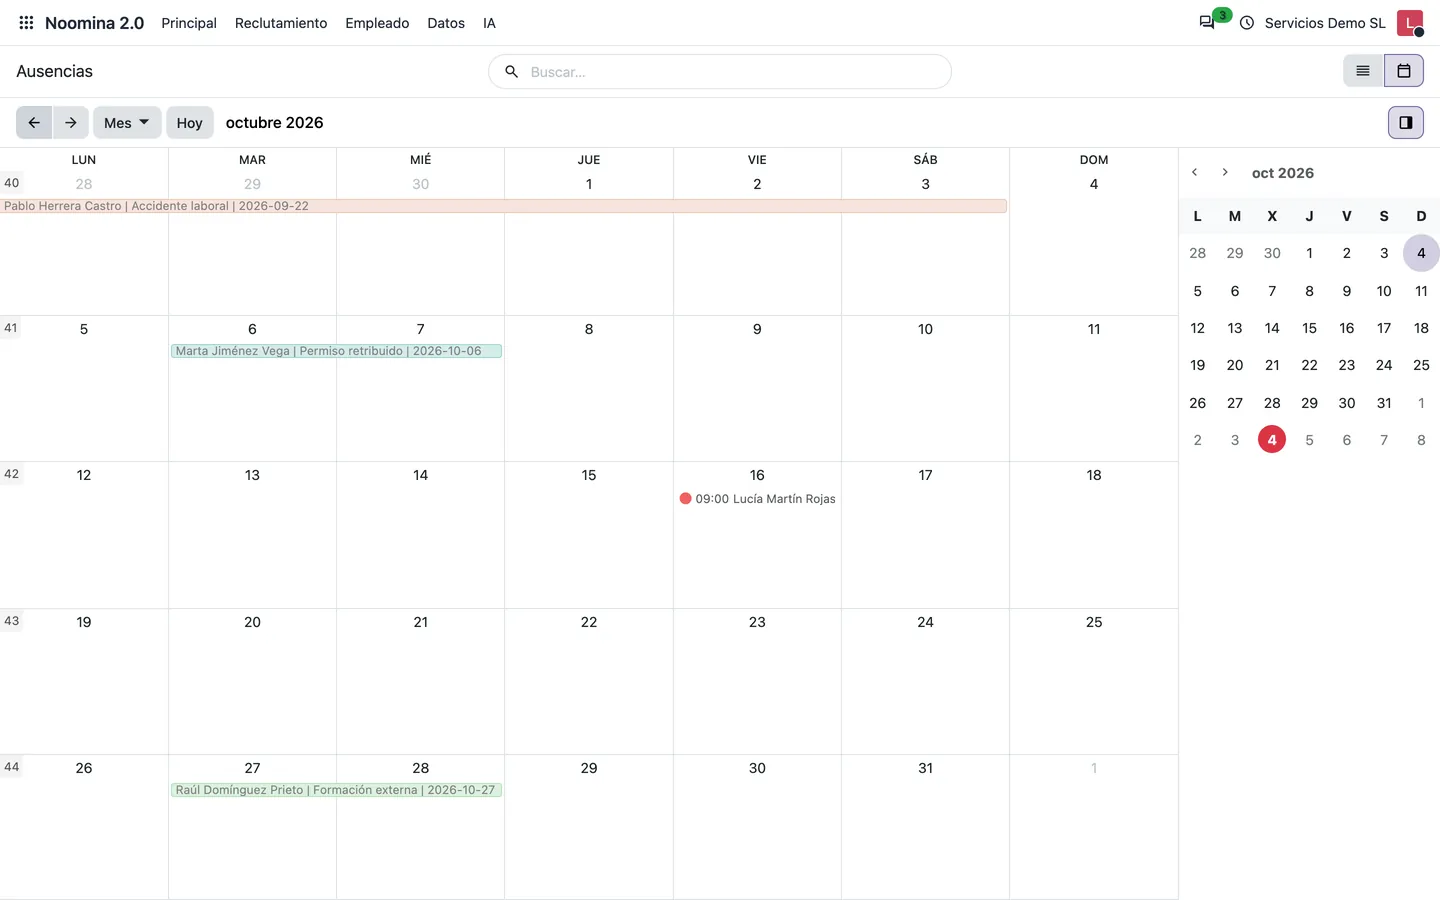
Absences record sick leave, medical appointments or permits with date and time; vacations are day-based requests with an approval flow. Both have list and calendar views.
- 1Go to Noomina 2.0 → Employee → Absences, click «New» and fill in «Employee», «Type», «Start Date» and «End Date» (the start cannot be after the end).
- 2Go to Employee → Vacations and click «New»: choose the employee and the dates. The request starts in Draft.
- 3Click «Submit» (it becomes Submitted), then «Approve» or «Reject». «Reject» is also available on an approved request; «Set to Draft» reopens it.
- 4Requests employees make on the portal arrive directly as Submitted, ready to approve.
- 5Switch to the calendar view with the view switcher to see who is away each day.
12 · Employees
Communications
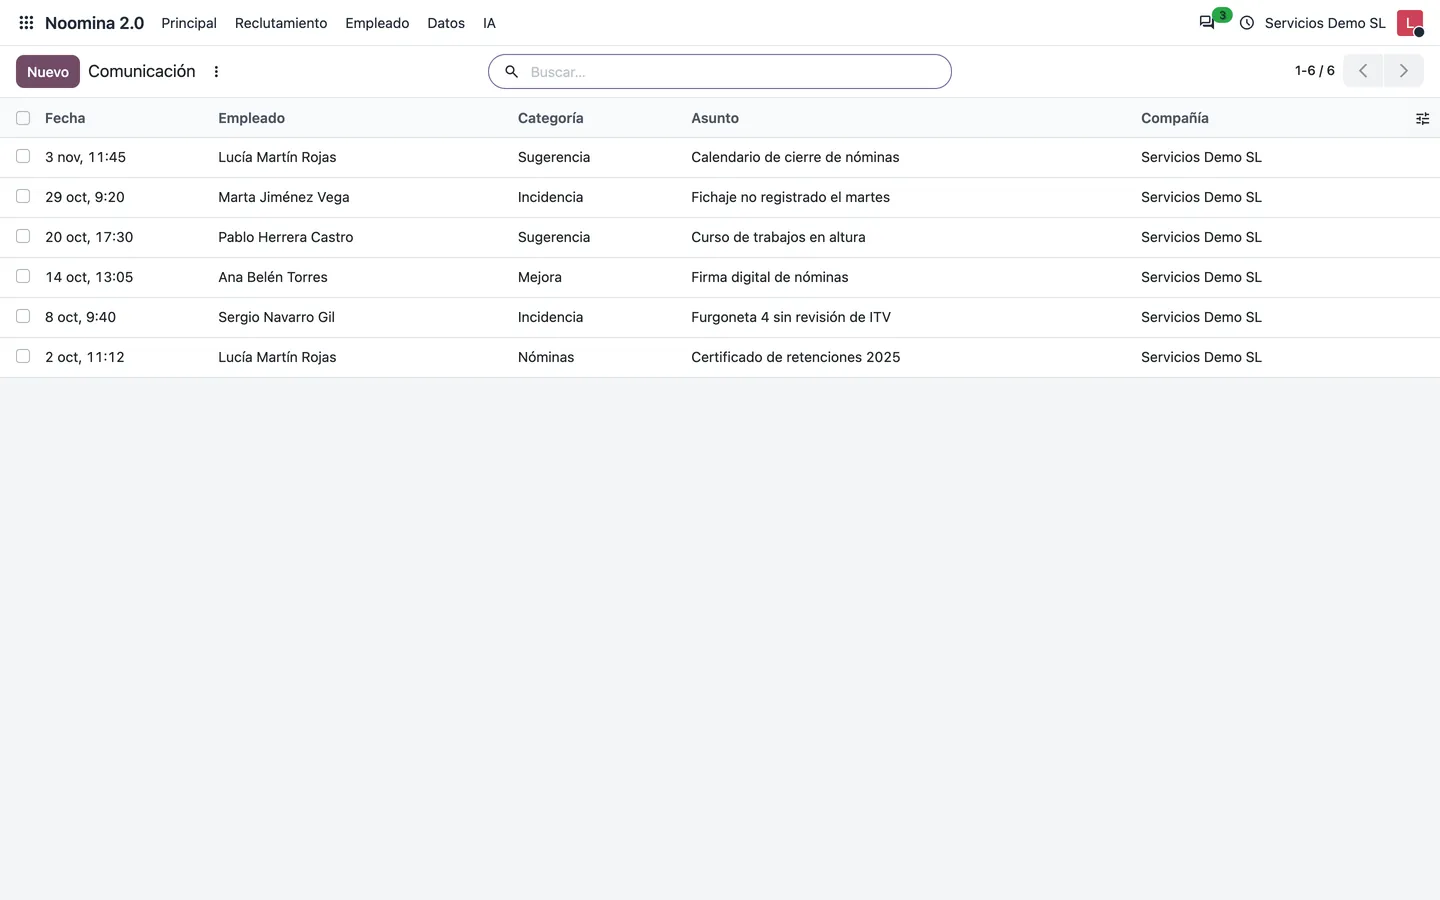
Communications are employee messages to HR (suggestions, issues, payroll requests…), sorted by category. Employees send them from the portal and HR handles them in the backend.
- 1Go to Noomina 2.0 → Employee → Communication to see every communication, newest first.
- 2Open one to read the «Subject», «Category», «Date» and «Message»; use the chatter to reply internally or schedule an activity.
- 3To record a communication received another way, click «New» and fill in employee, subject, category and message.
- 4Group or filter by category or employee from the search bar.
13 · Employees
Employee documents and expiry dates
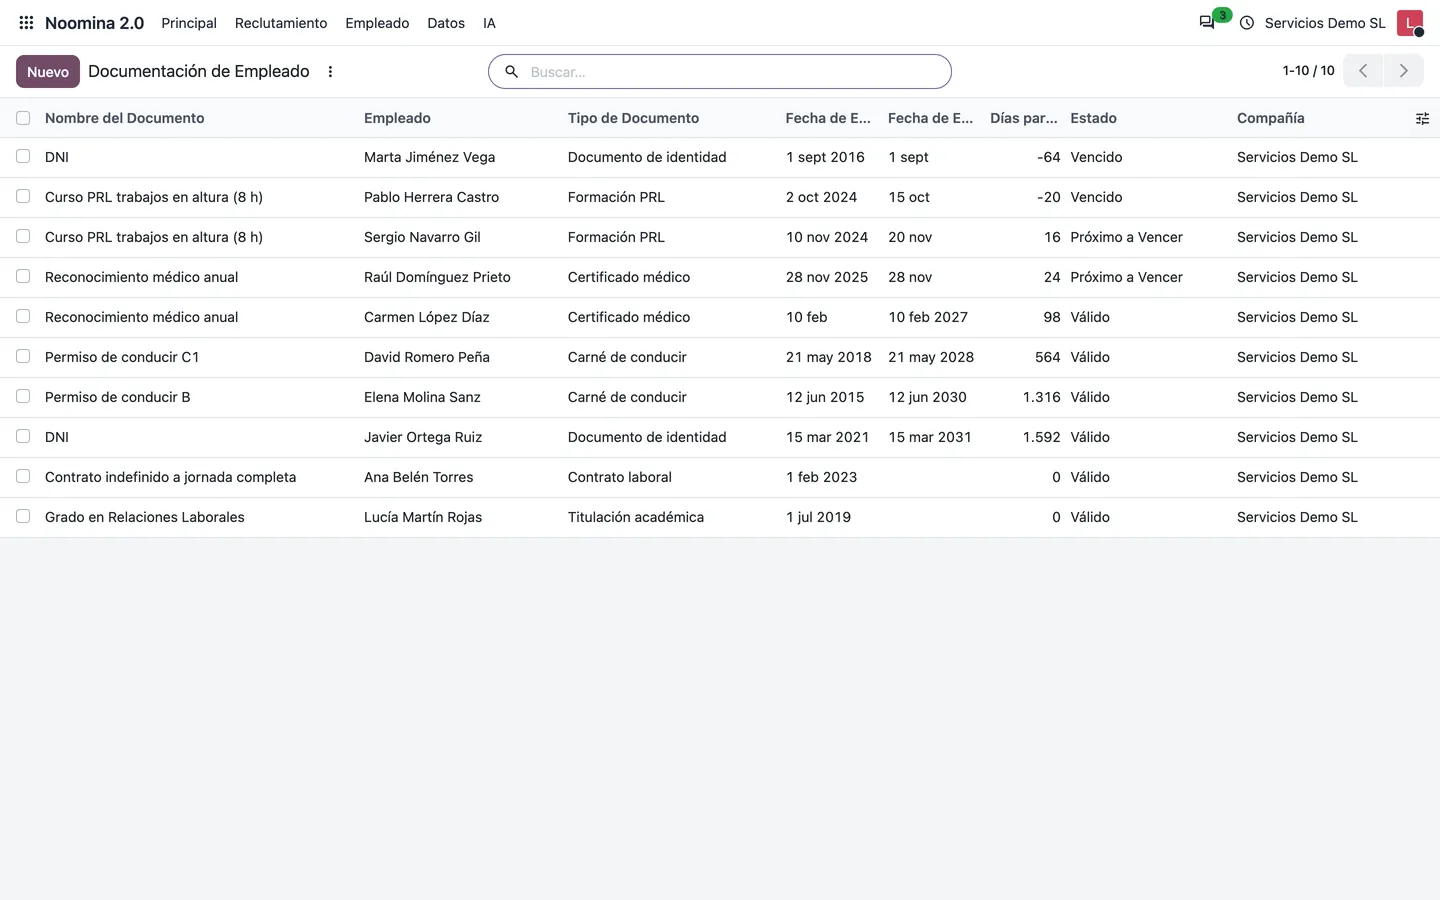
Employee documentation stores ID cards, licences, safety courses, medical checks or contracts with their issue and expiry dates, and works out their status so nothing expires unnoticed.
- 1Go to Noomina 2.0 → Employee → Employee Documentation and click «New».
- 2Fill in «Document Name», «Employee», «Document Type», «Issue Date», «Expiration Date» and optionally «Notes»; attach the file from the chatter.
- 3The «Status» is computed on save: Valid, Expiring Soon (expires in 30 days or less) or Expired; «Days to Expire» shows the margin. A document without an expiry date is always Valid.
- 4Use the «Expired», «Expiring Soon» and «Valid» search filters to plan renewals.
Tip: The status is recalculated when the expiry date changes; to review the list against today's date, sort it by «Expiration Date».
14 · Employees
Document requirements
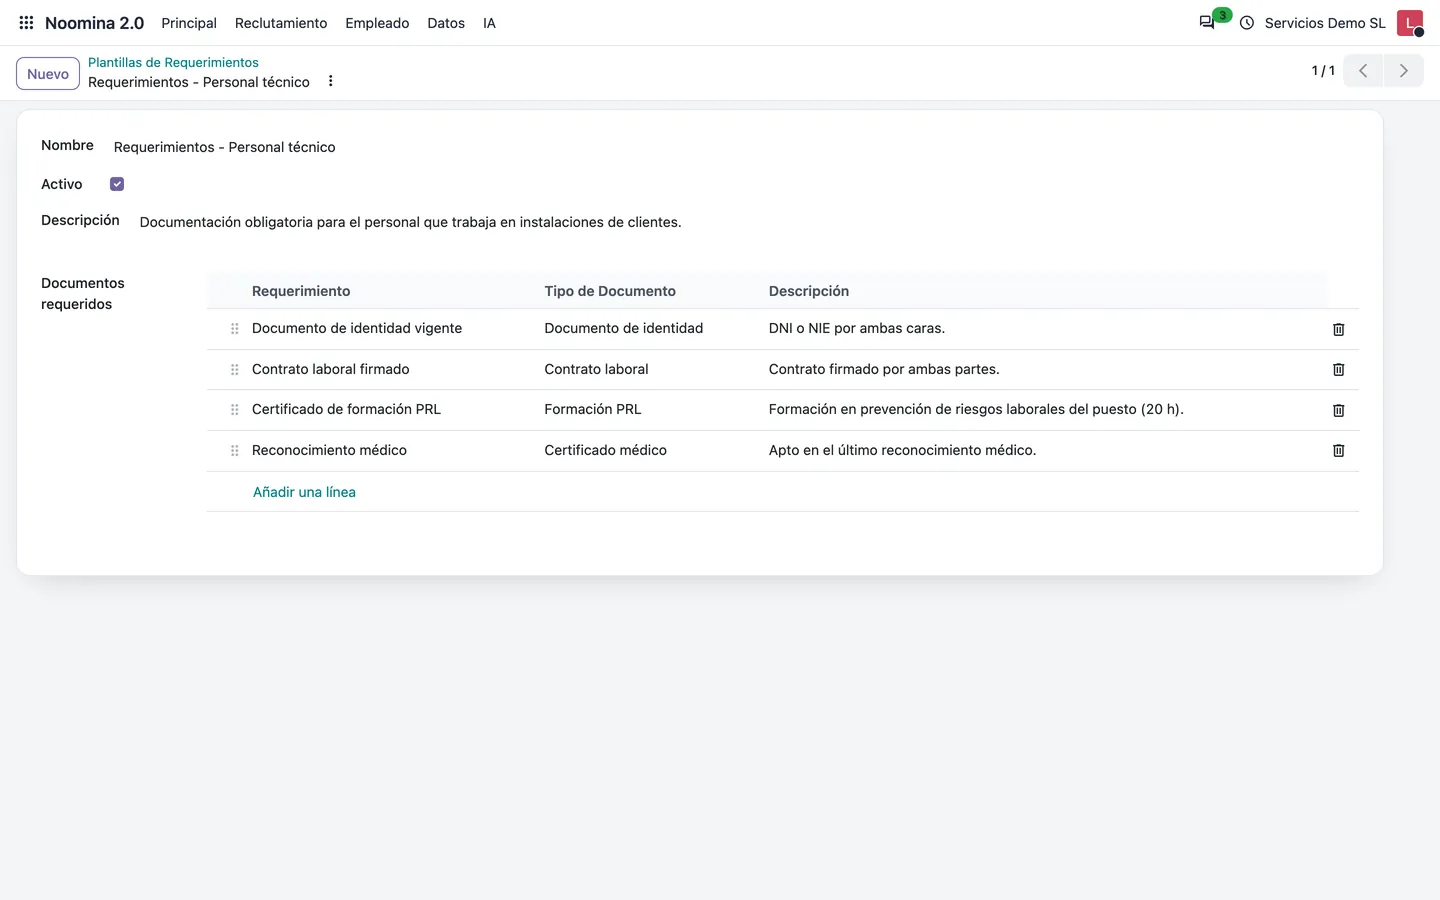
Requirements say which documents each employee must hand in. They are defined in templates and created automatically when the template is assigned to the employee; the employee uploads them from the portal.
- 1Go to Noomina 2.0 → Employee → Requirement Templates, click «New», enter the «Name» and add one line per document in «Required Documents» (Requirement, Document Type and Description).
- 2On the employee form choose the «Requirement Template»: one requirement per line is created. If you change templates or add lines, requirements are updated and the ones no longer needed are archived.
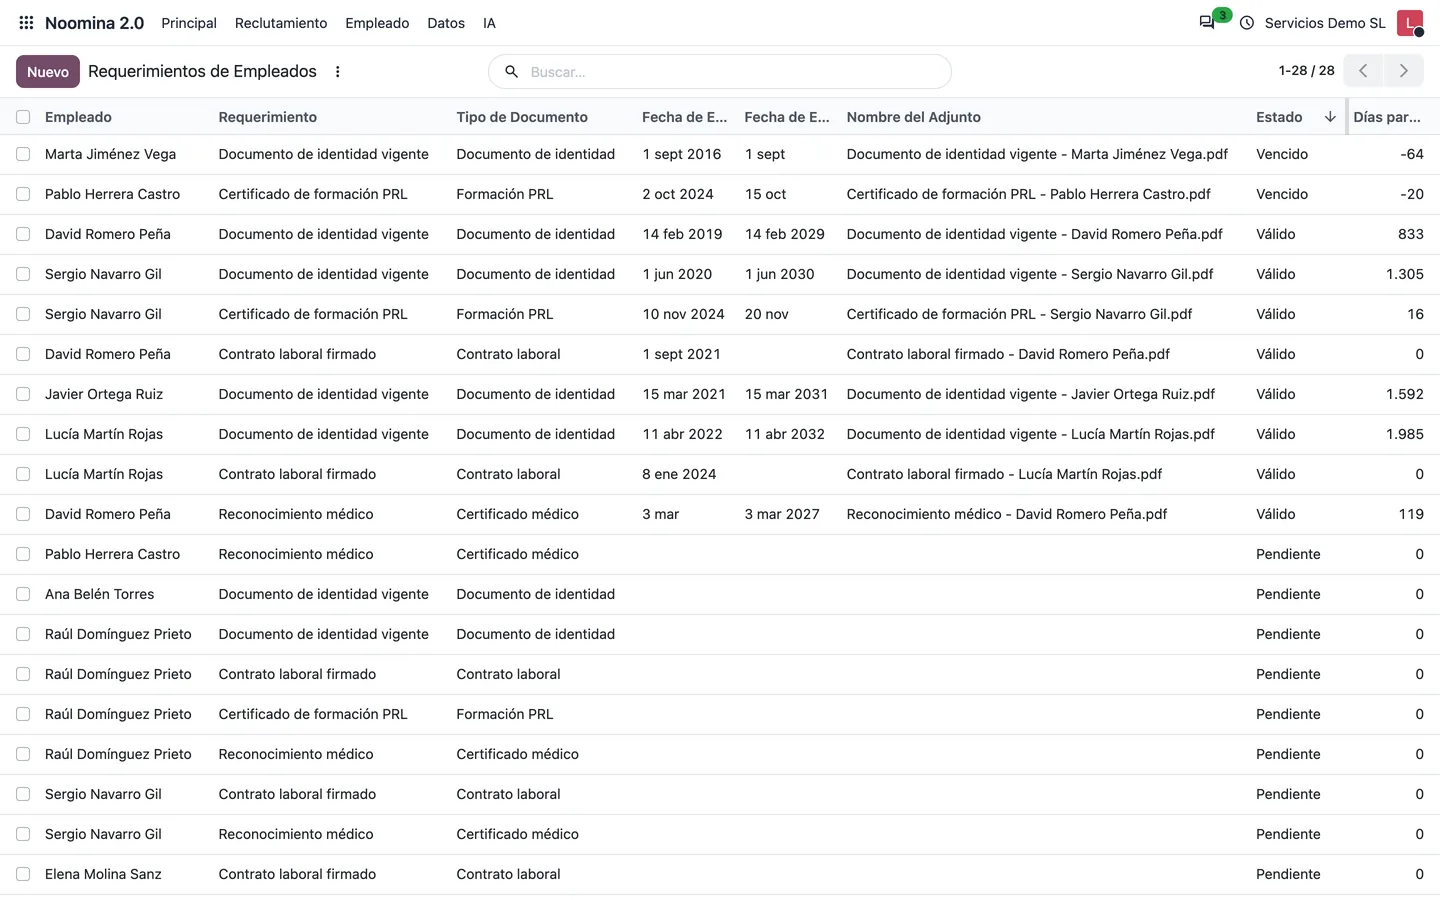
- 3In Employee → Employee Requirements you see the status of all of them: Pending (no file), Valid or Expired (by their «Expiration Date»).
- 4Open one to see or attach the file, the dates and «Uploaded On»; the «Download Attachment» button downloads the delivered document.
15 · Employees
Checklists (onboarding and offboarding)
Checklists group the tasks of a process, such as onboarding a new employee or their exit. You build one once and copy it to as many employees as needed.
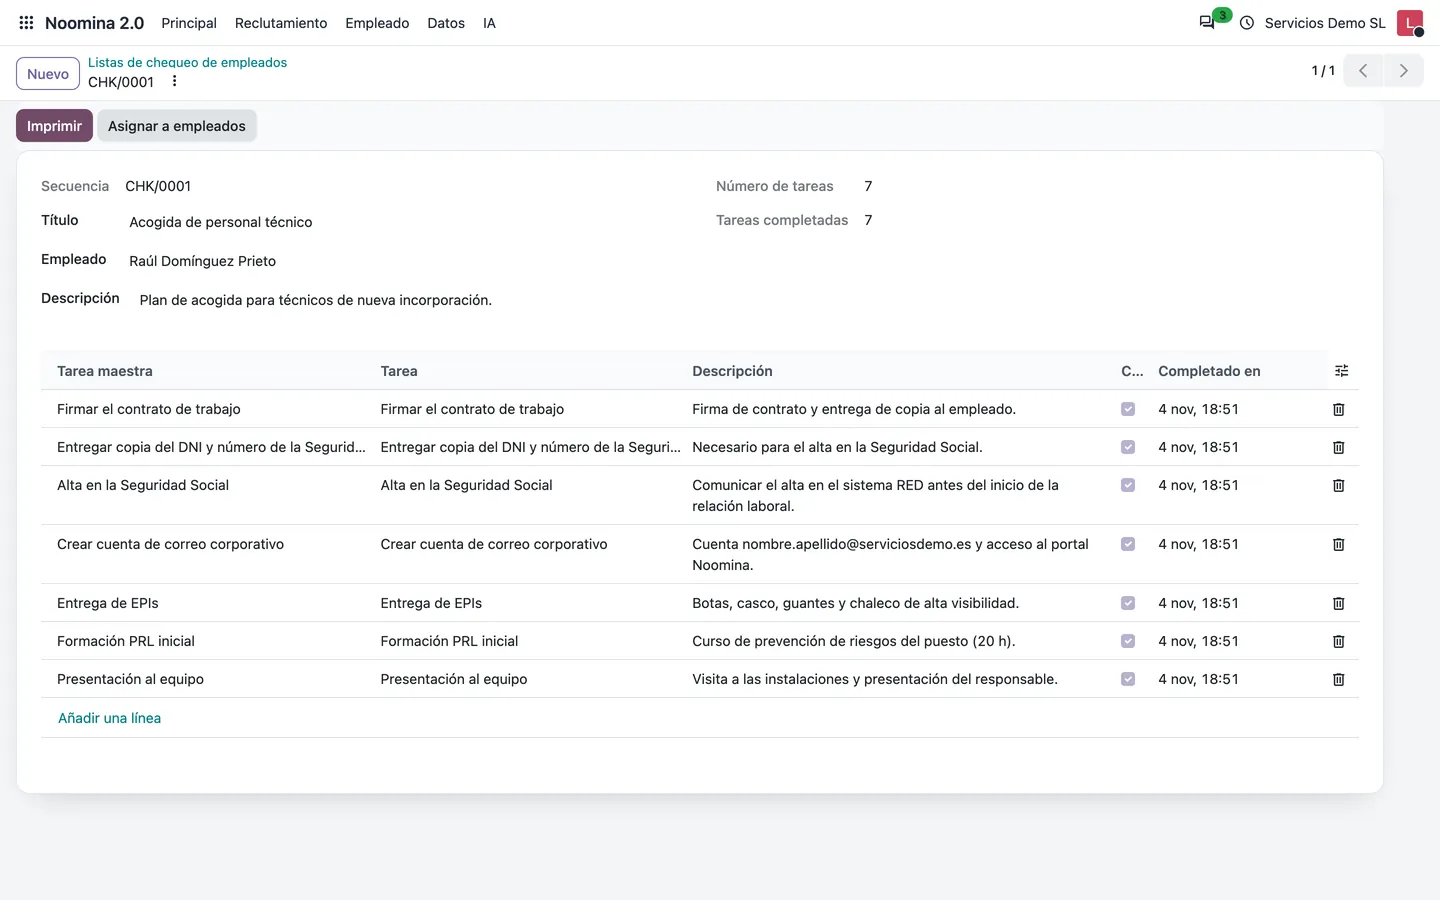
- 1Go to Noomina 2.0 → Employee → Checklist and click «New»: enter the «Title», «Description» and «Employee». It gets a number on save (CHK/0001…).
- 2Add the tasks: choose a «Task Master» (its name and description are copied) or type a free task.
- 3Tick «Completed» on each finished task: the date is stored in «Completed On» and the progress updates (completed tasks / total). The employee can also complete them on the portal.
- 4Click «Assign to Employees», choose the employees and click «Assign»: each one gets their own copy with every task pending.
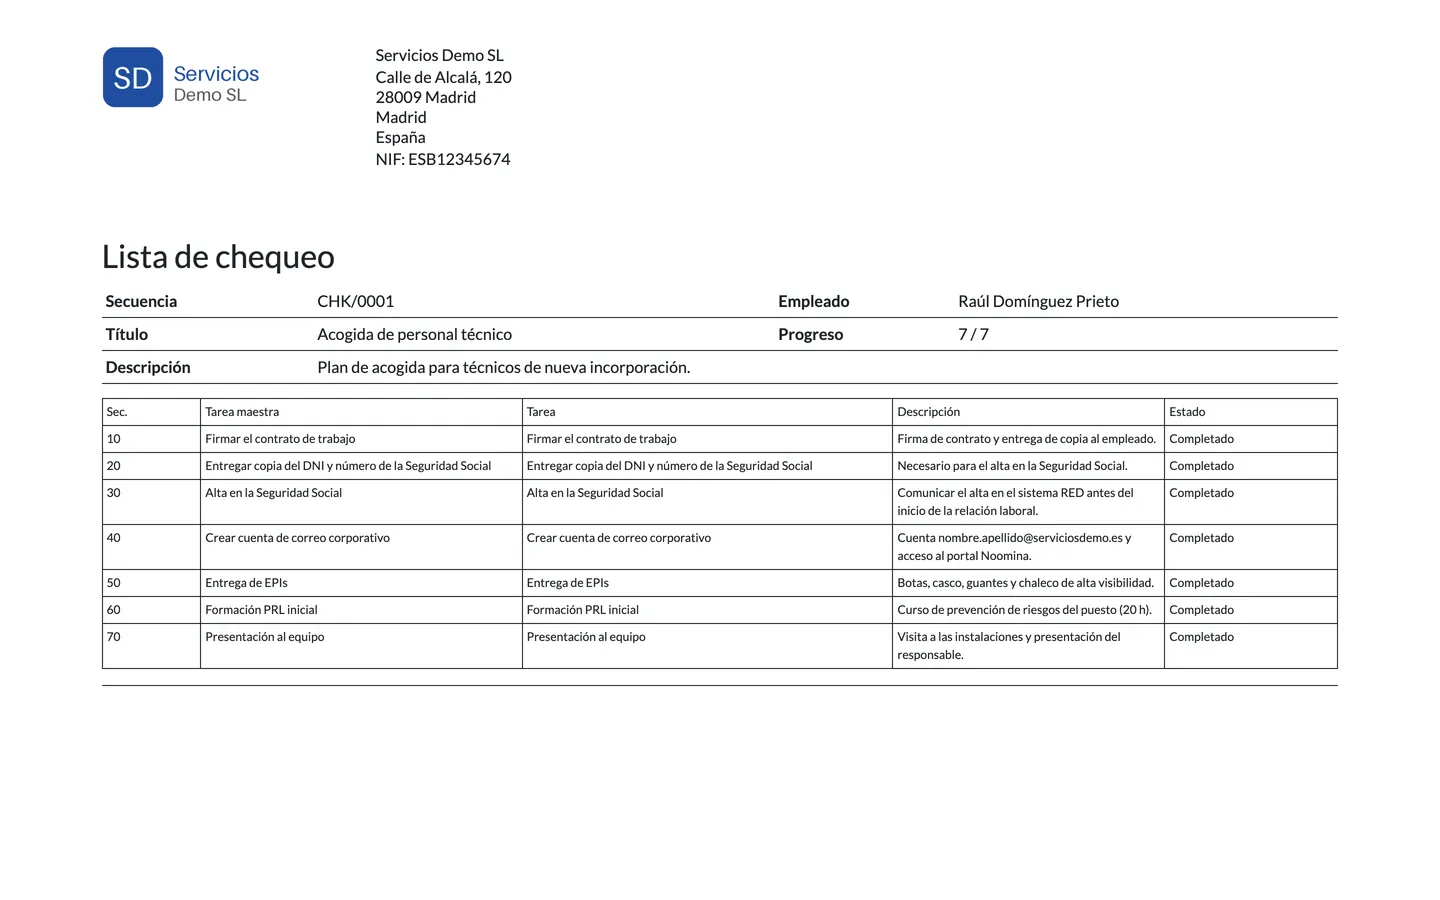
- 5Click «Print» to get the checklist as a PDF with the status of each task.
16 · Employees
Employee tasks and notes
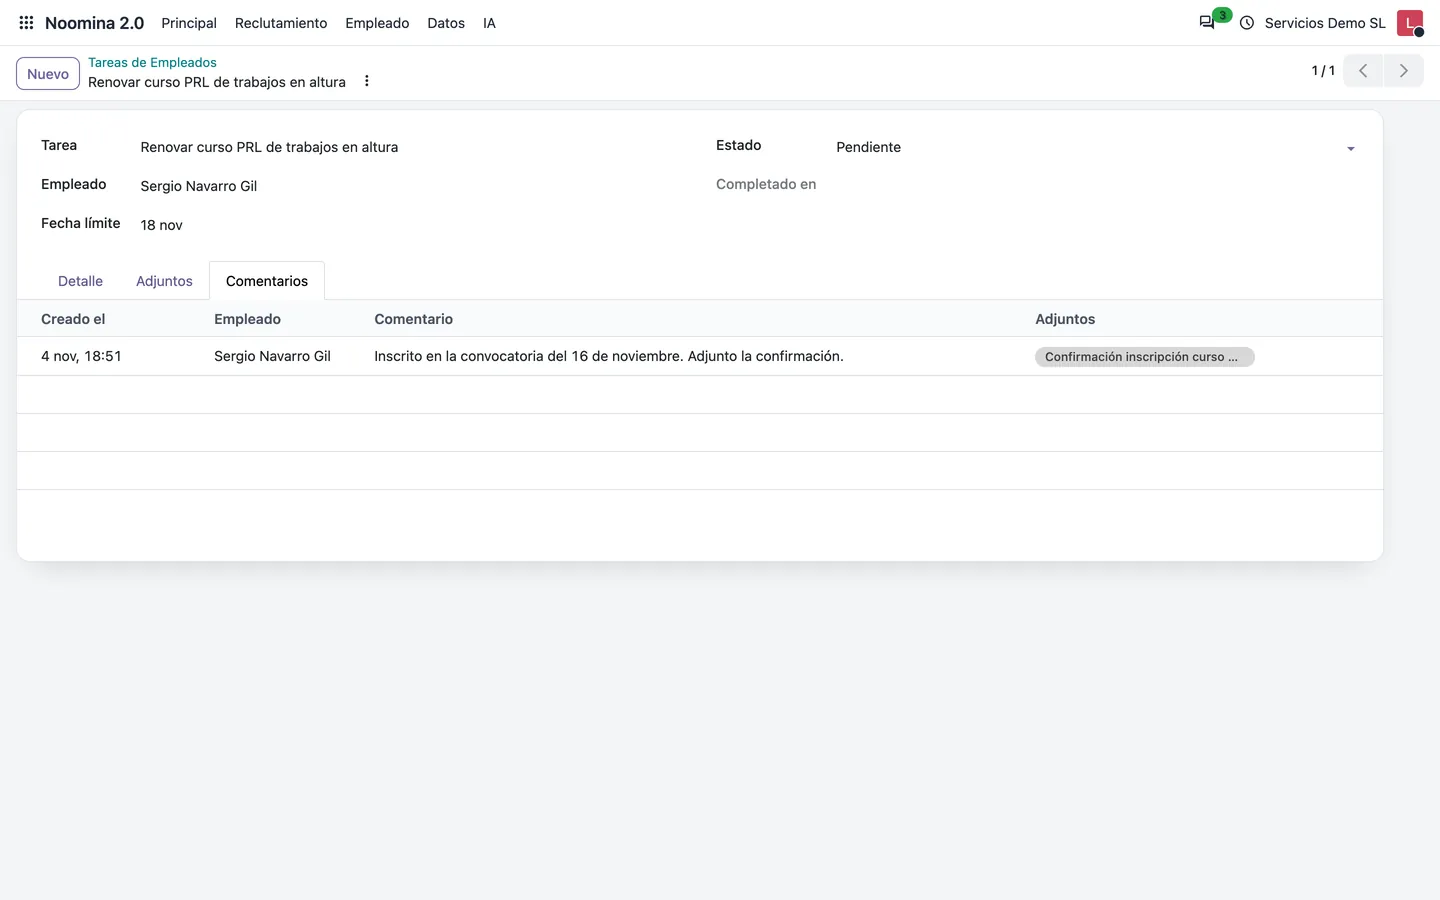
Tasks are assignments for an employee with a due date, files and a comment thread the employee continues on the portal. Notes are HR remarks about the employee that they can also read and add on the portal.
- 1Go to Noomina 2.0 → Employee → Employee Tasks and click «New»: enter the «Task», «Employee», «Due Date» and, in «Detail», the description.
- 2In the «Attachments» tab upload the files the employee needs.
- 3The «Comments» tab shows the comments and files the employee sends from the portal, with their date.
- 4When the employee clicks «Mark Completed» on the portal, the task becomes Completed with its date; you can also change the «Status» on the form.
- 5In Employee → Employee Notes create notes with «Date», «Employee», «Title» and «Description».
17 · Recruitment
Job positions and the public form
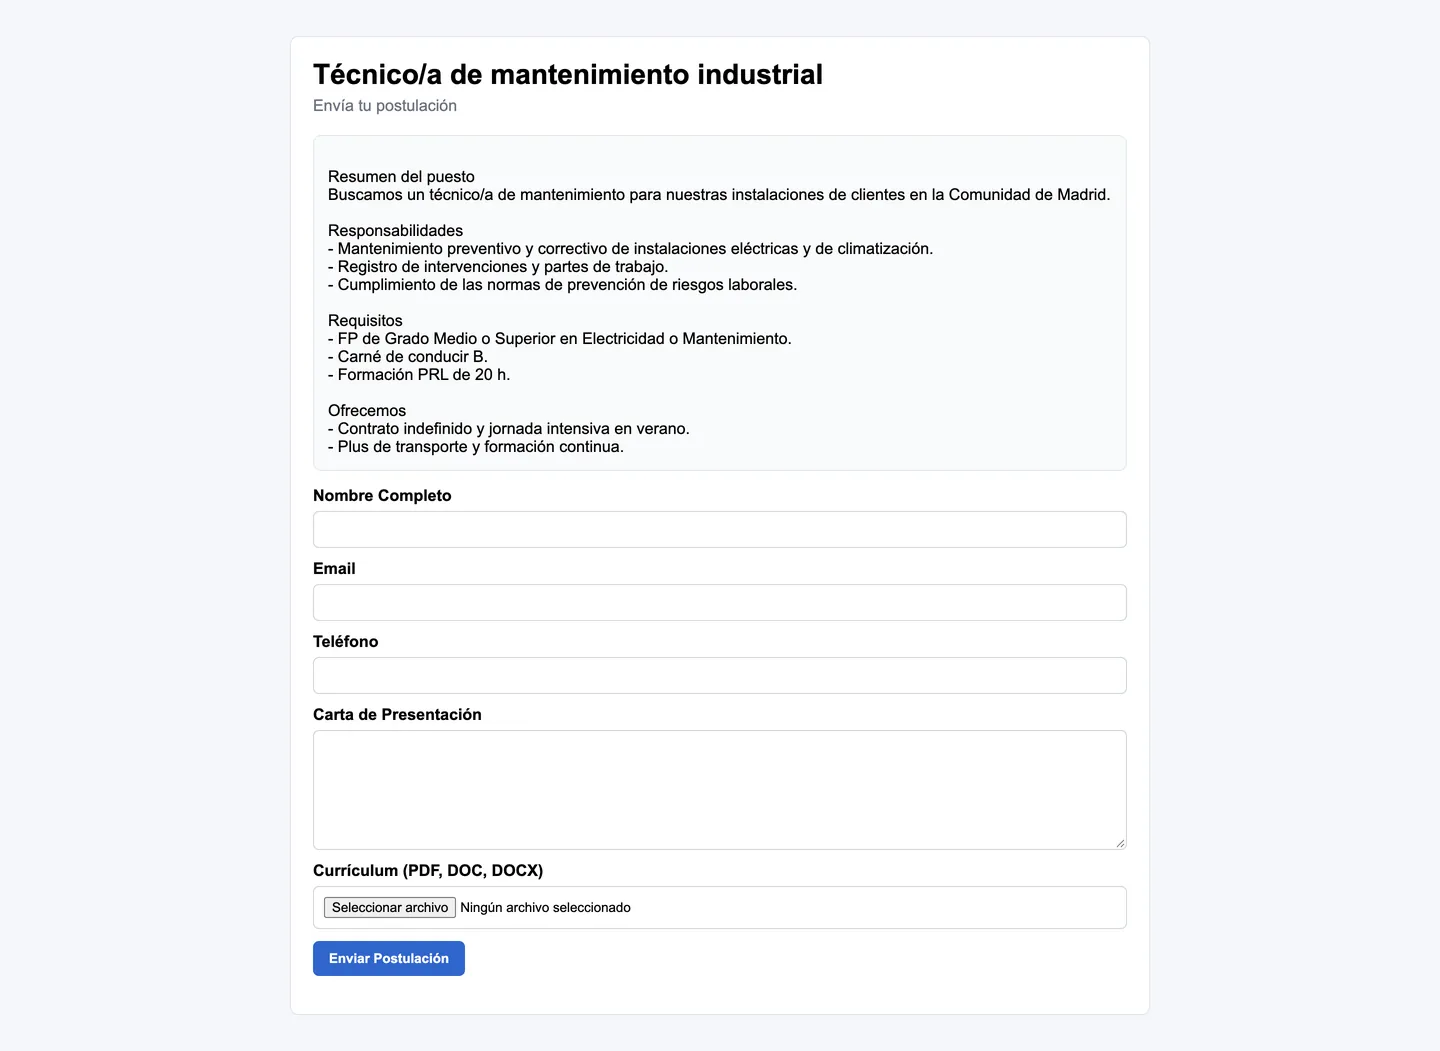
Each published job position has a public link with a form where candidates send their details, cover letter and CV, without needing an account.
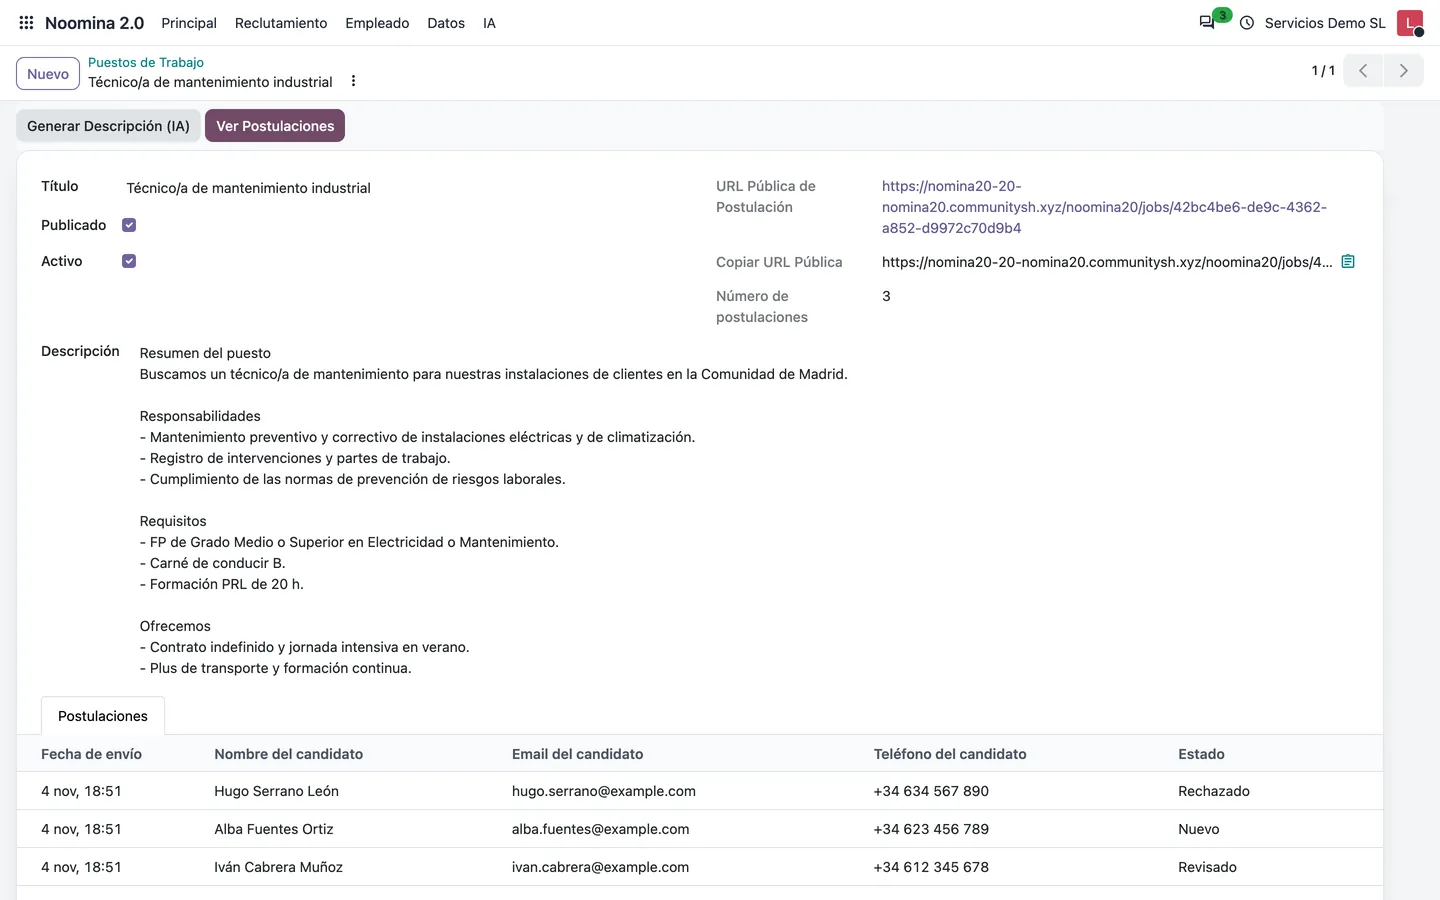
- 1Go to Noomina 2.0 → Recruitment → Job Positions and click «New»: enter the job title and description.
- 2If the ChatGPT key is set up, «Generate Description (AI)» writes the full description (summary, responsibilities, requirements and what we offer) in the language of the title.
- 3Keep «Published» ticked and copy the link with «Copy Public URL»; share it on your website or job boards.
- 4The candidate opens the link, fills in Full Name, Email, Phone, Cover Letter and Resume, and clicks «Submit Application».
- 5«View Applications» opens the position's applications. Untick «Published» to close the form.
18 · Recruitment
Applications and AI review
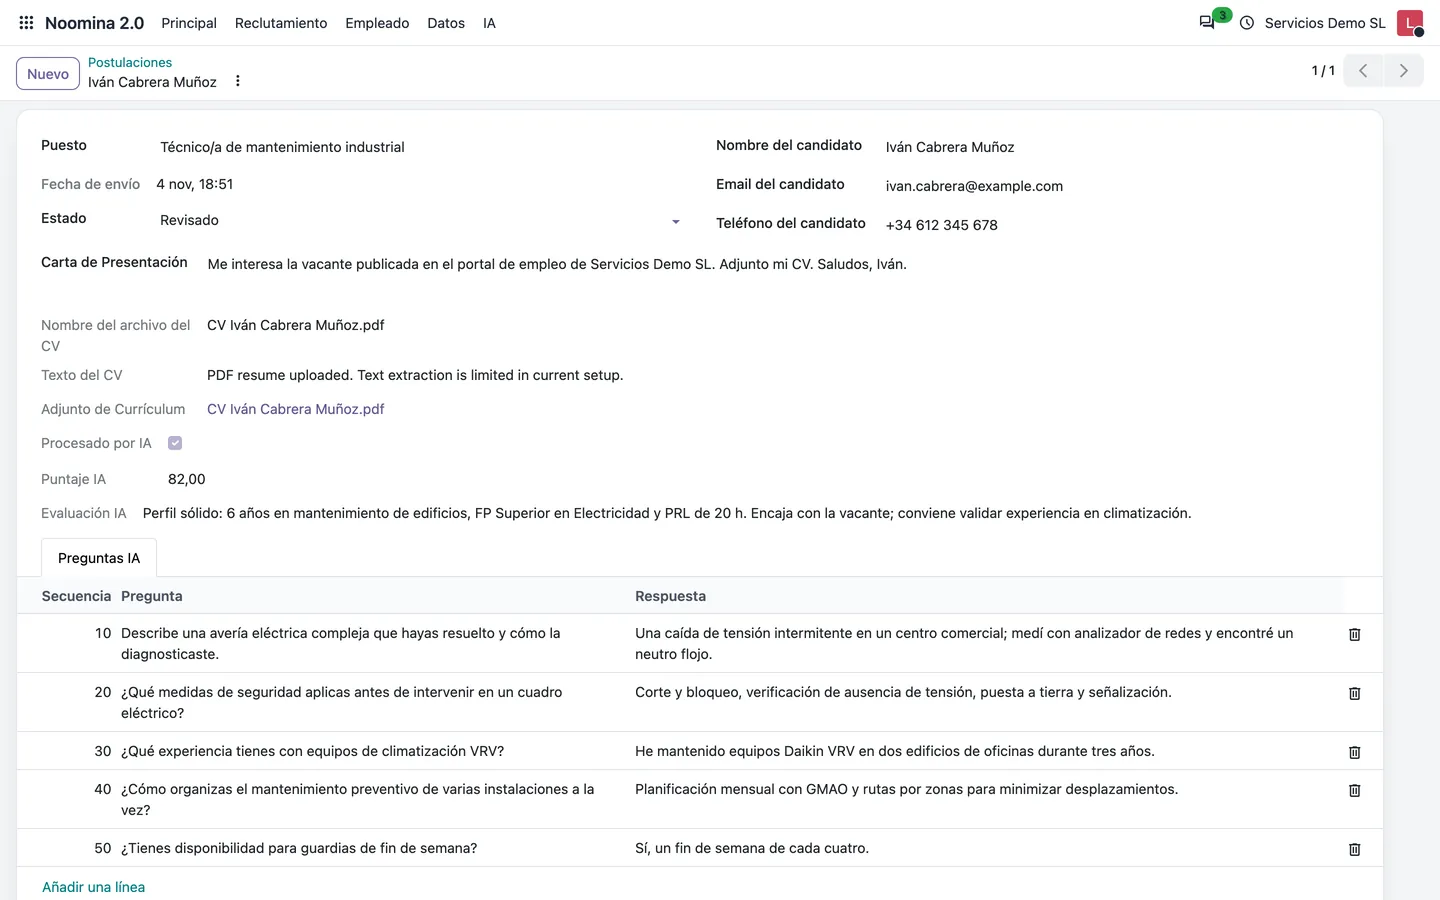
Each application stores the candidate details and CV. With the ChatGPT key set up, the AI scores the fit with the position and prepares ten interview questions the candidate answers online.
- 1Go to Recruitment → Job Applications: you see the submission date, the position, the candidate, their «AI Score» and the status.
- 2When the form is sent and a ChatGPT key exists, «AI Score» (0–100), «AI Feedback» and the «AI Questions» tab are filled in, and the candidate moves to a page where they answer the questions and click «Save Answers».
- 3Open the application to read the cover letter, download the CV («Resume Attachment») and see the answers next to each question.
- 4Change the «Status» to Reviewed, Rejected or Hired as the process moves on.
Tip: Without a ChatGPT key the application is still saved and the candidate sees a notice that the questions could not be generated.
19 · Recruitment
AI configuration
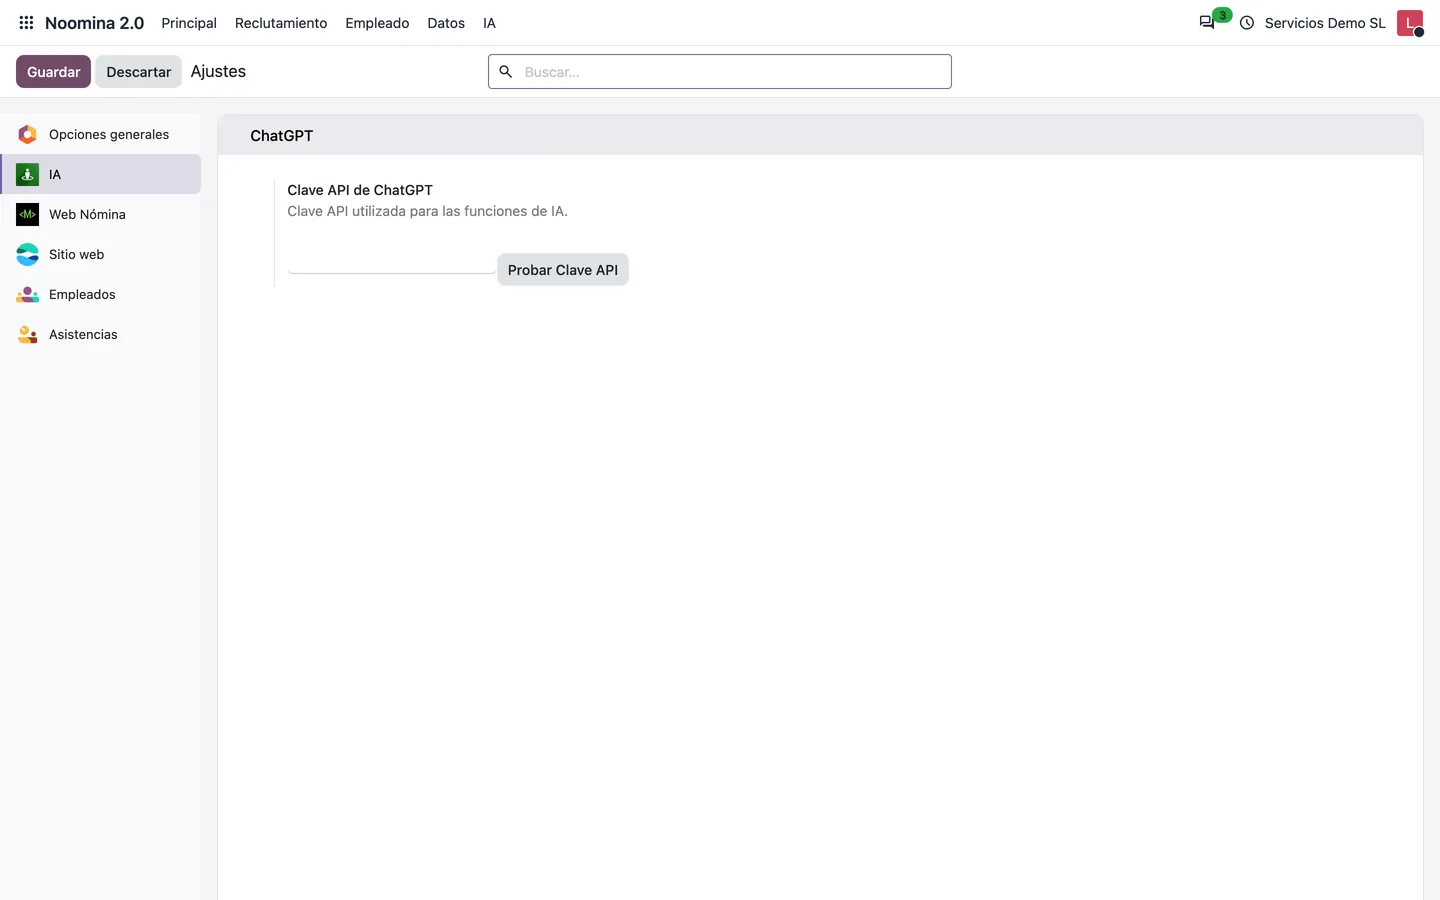
The AI features (job descriptions, candidate review and the portal chat) use the OpenAI API with the gpt-4o-mini model. They only need a key.
- 1Go to Noomina 2.0 → AI → Configuration (you must be an Odoo administrator).
- 2In the ChatGPT block paste your «ChatGPT API Key» and save.
- 3Click «Test API Key»: a notification confirms the key is valid or shows the OpenAI error.
20 · Employee portal
Portal access and payslips
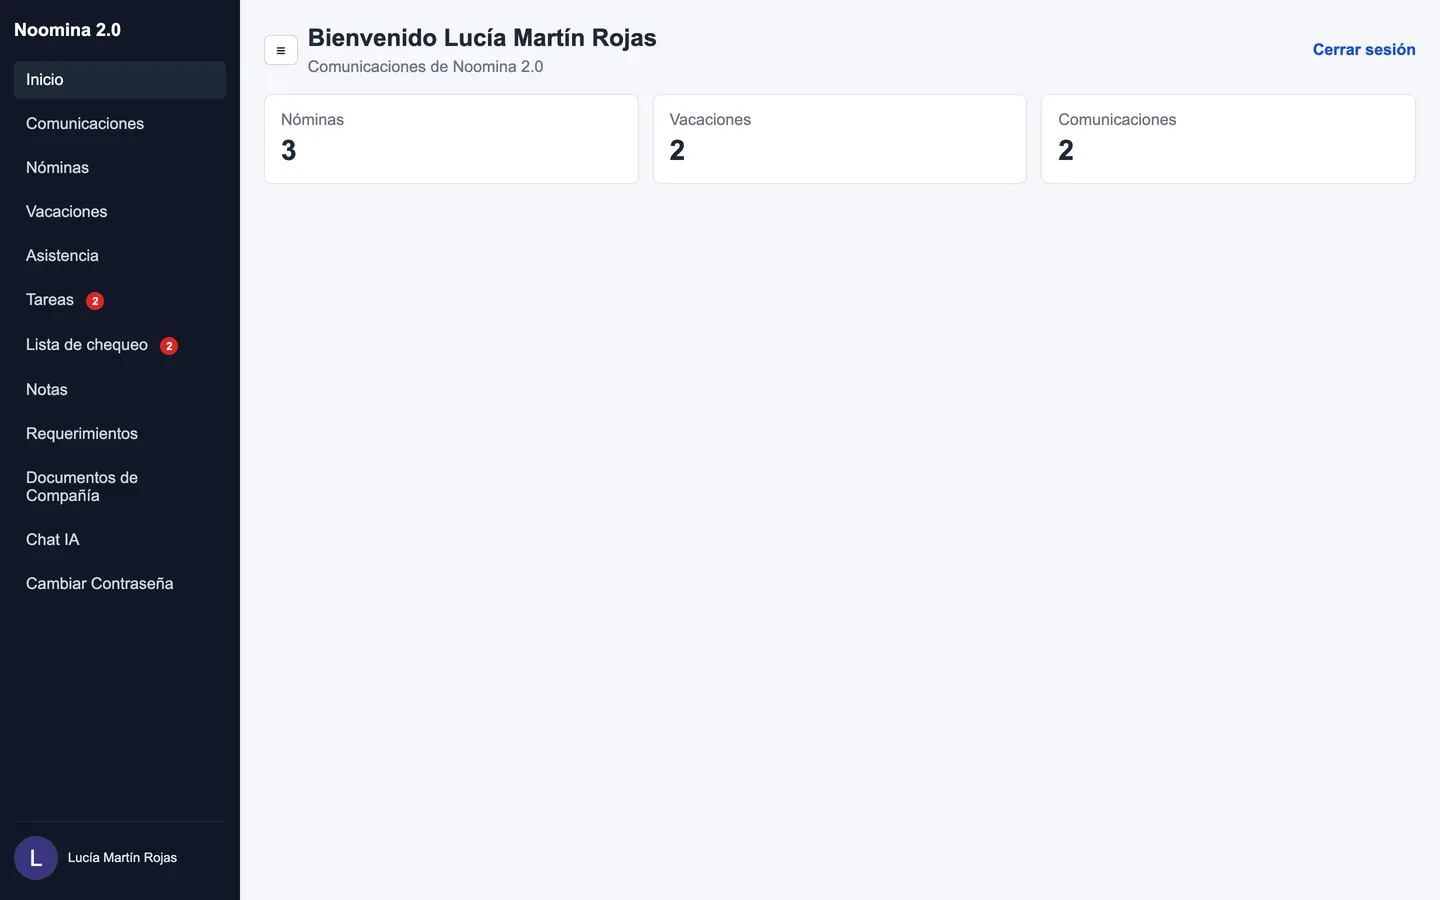
The employee portal is a separate site at /noomina20/portal/login. Employees sign in with the user and password from their form, without being Odoo users, and see their payslips and data.
- 1Send the employee the «Noomina 2.0 Dashboard URL» from their form together with their user and password.
- 2The employee clicks Sign In. Home shows how many payrolls, vacations and communications they have, and the side menu flags pending tasks, checklists and requirements in red.
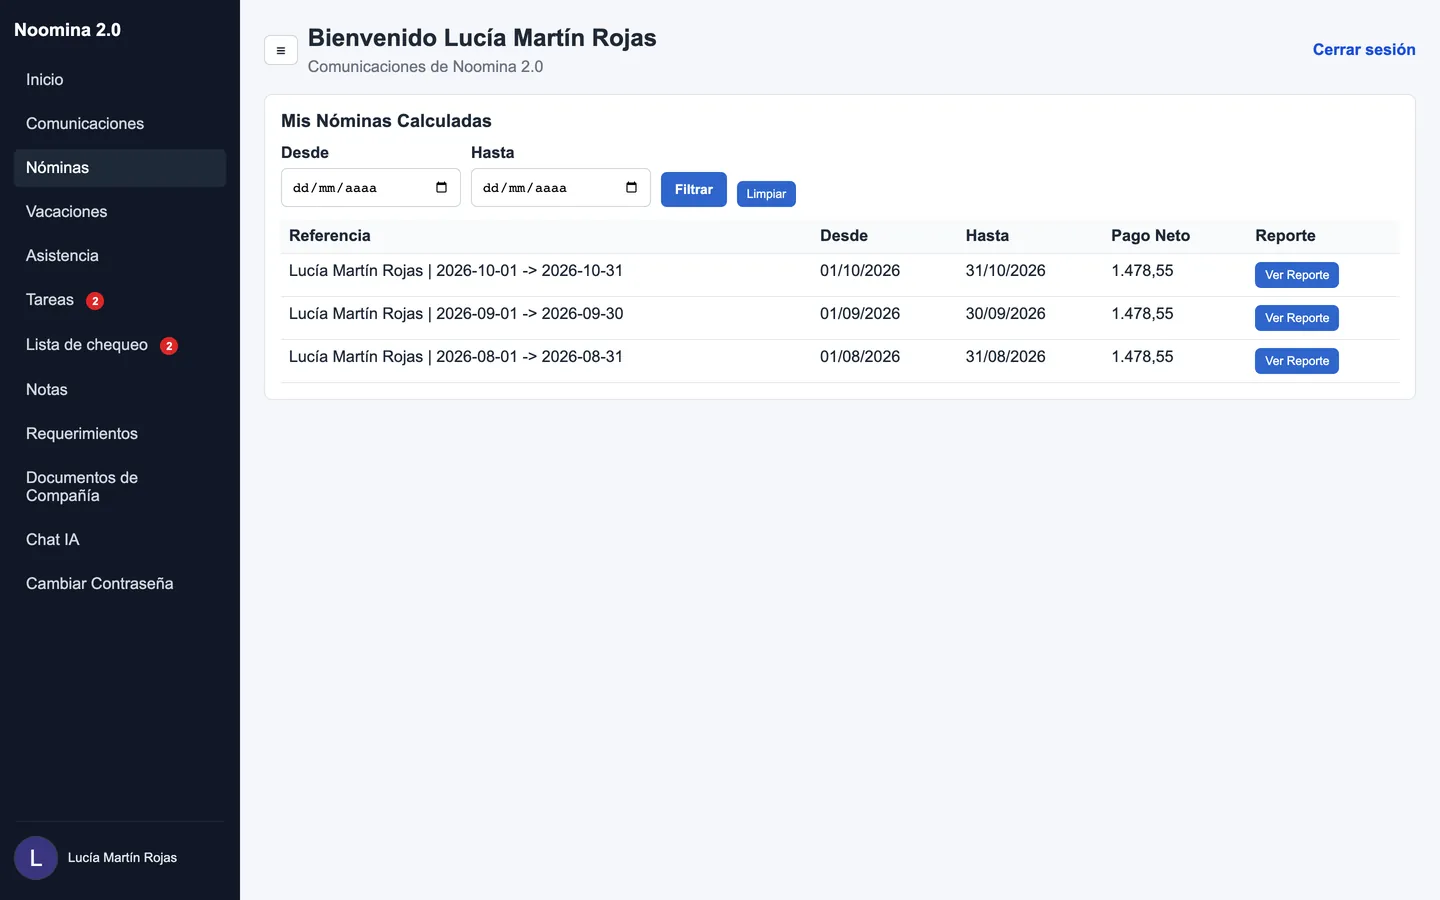
- 3Under «Payrolls» they see their calculated payrolls (the latest 20), can filter by From and To, and click «View Report» to open the PDF payslip.
- 4Under «Change Password» they can change theirs (at least 6 characters) by entering the current one.
21 · Employee portal
Vacations, attendance, communications and notes on the portal
On the portal employees handle their day-to-day requests without going through HR: they request vacations, clock in and out, send communications and write notes.
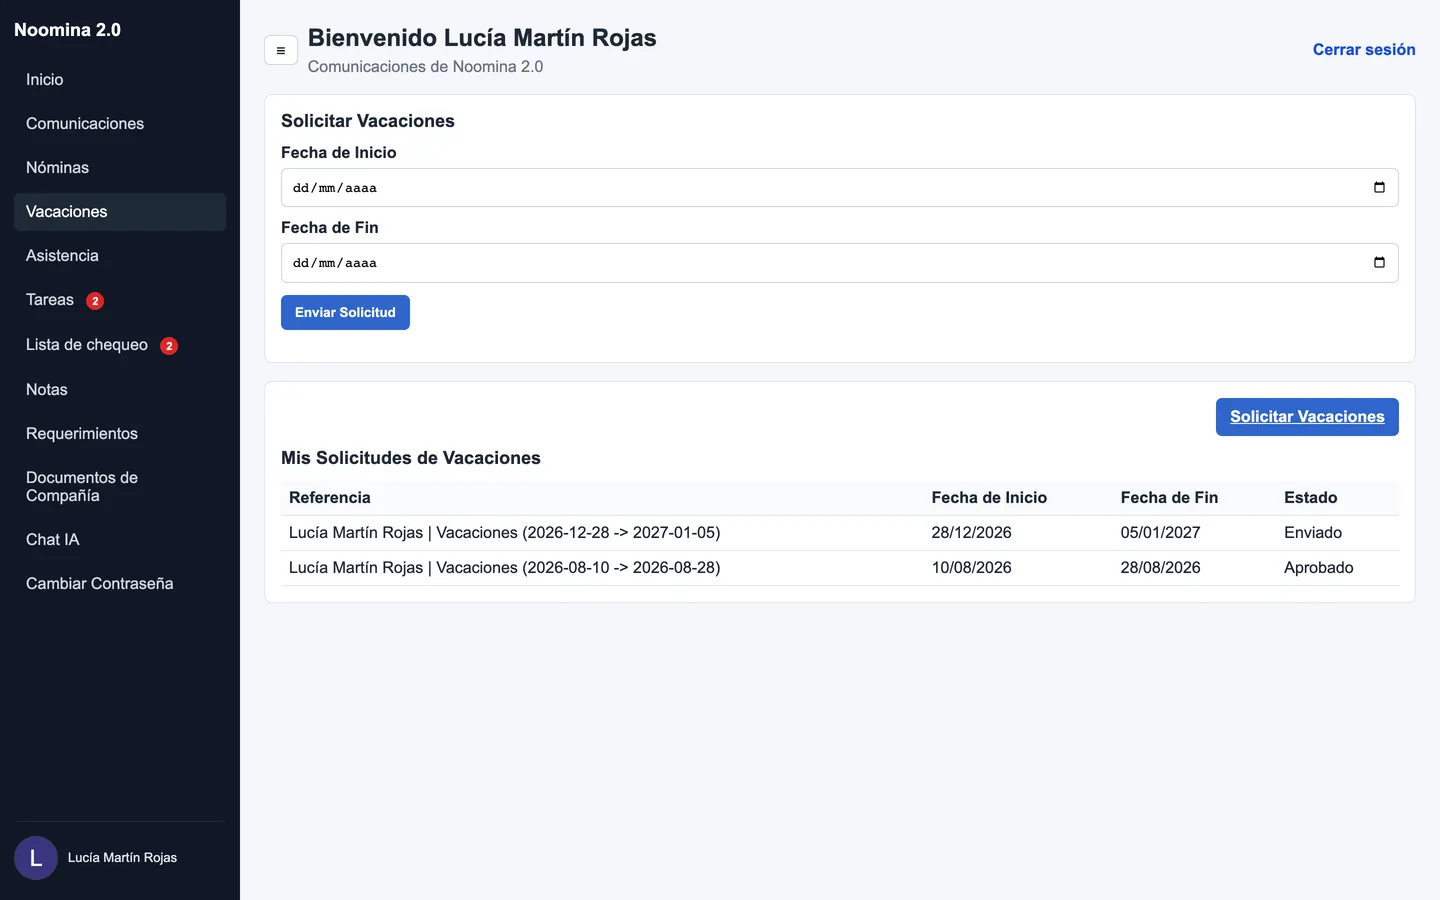
- 1«Vacations» → «Request Vacation»: pick Start Date and End Date and click «Submit Request». The request reaches HR as Submitted and the employee sees the status of all of theirs.
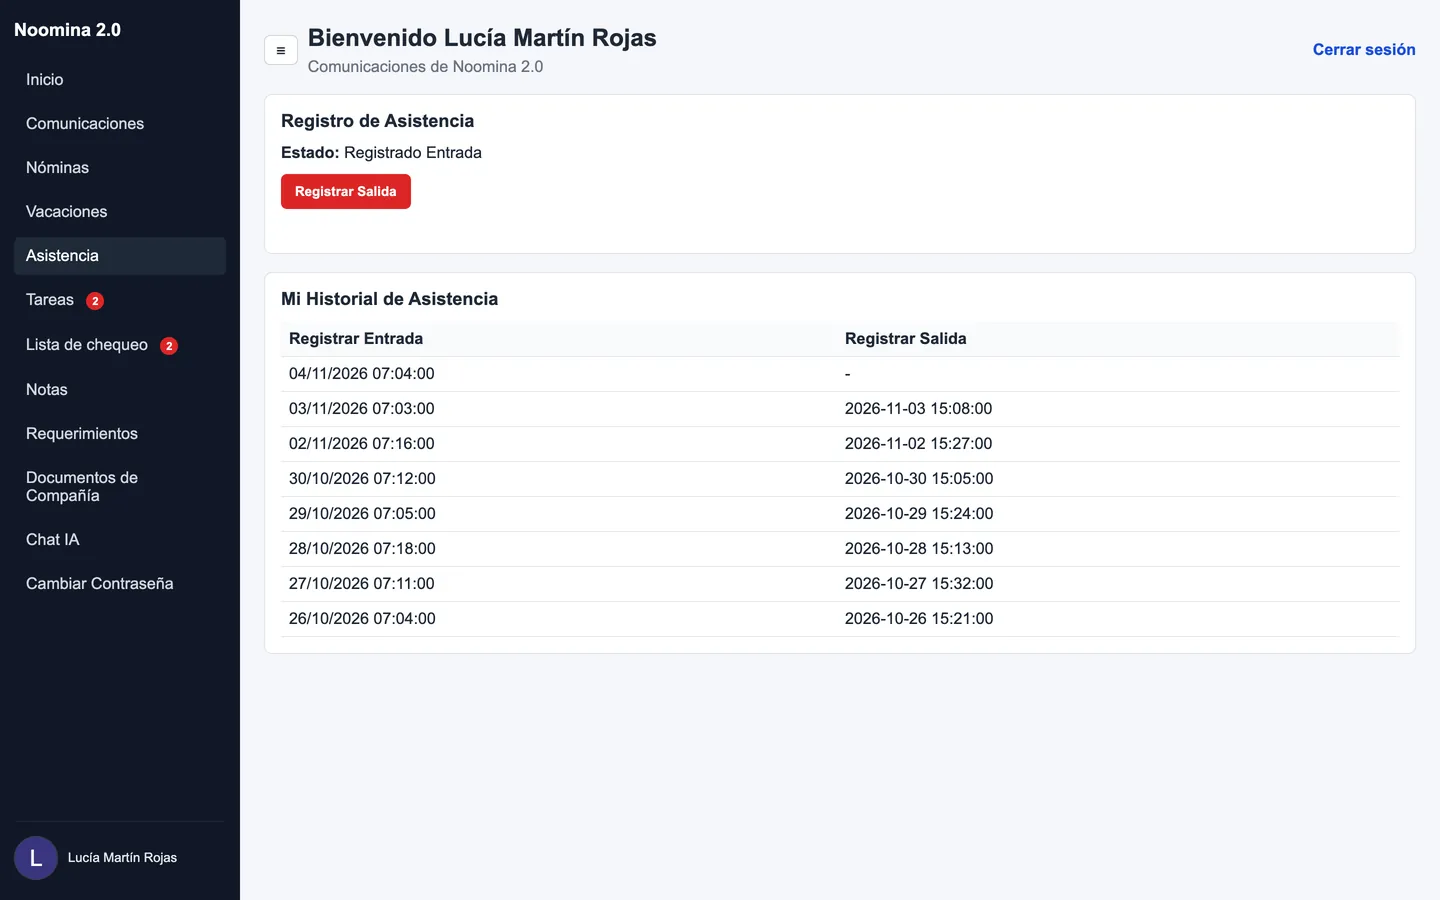
- 2«Attendance»: «Check In» and «Check Out» create records in Odoo Attendances; their latest attendance history is listed below.
- 3«Communications» → «Create»: Subject, Category and Message. It shows up immediately in Employee → Communication in the backend.
- 4«Notes» → «Create»: Title and Description; they also see the notes HR has written about them.
- 5«Company Documents»: download the documents the company has published.
22 · Employee portal
Tasks, checklists, requirements and AI chat
The portal closes the loop on what HR asks of employees: they complete tasks and checklists, upload required documents and ask an AI assistant their questions.
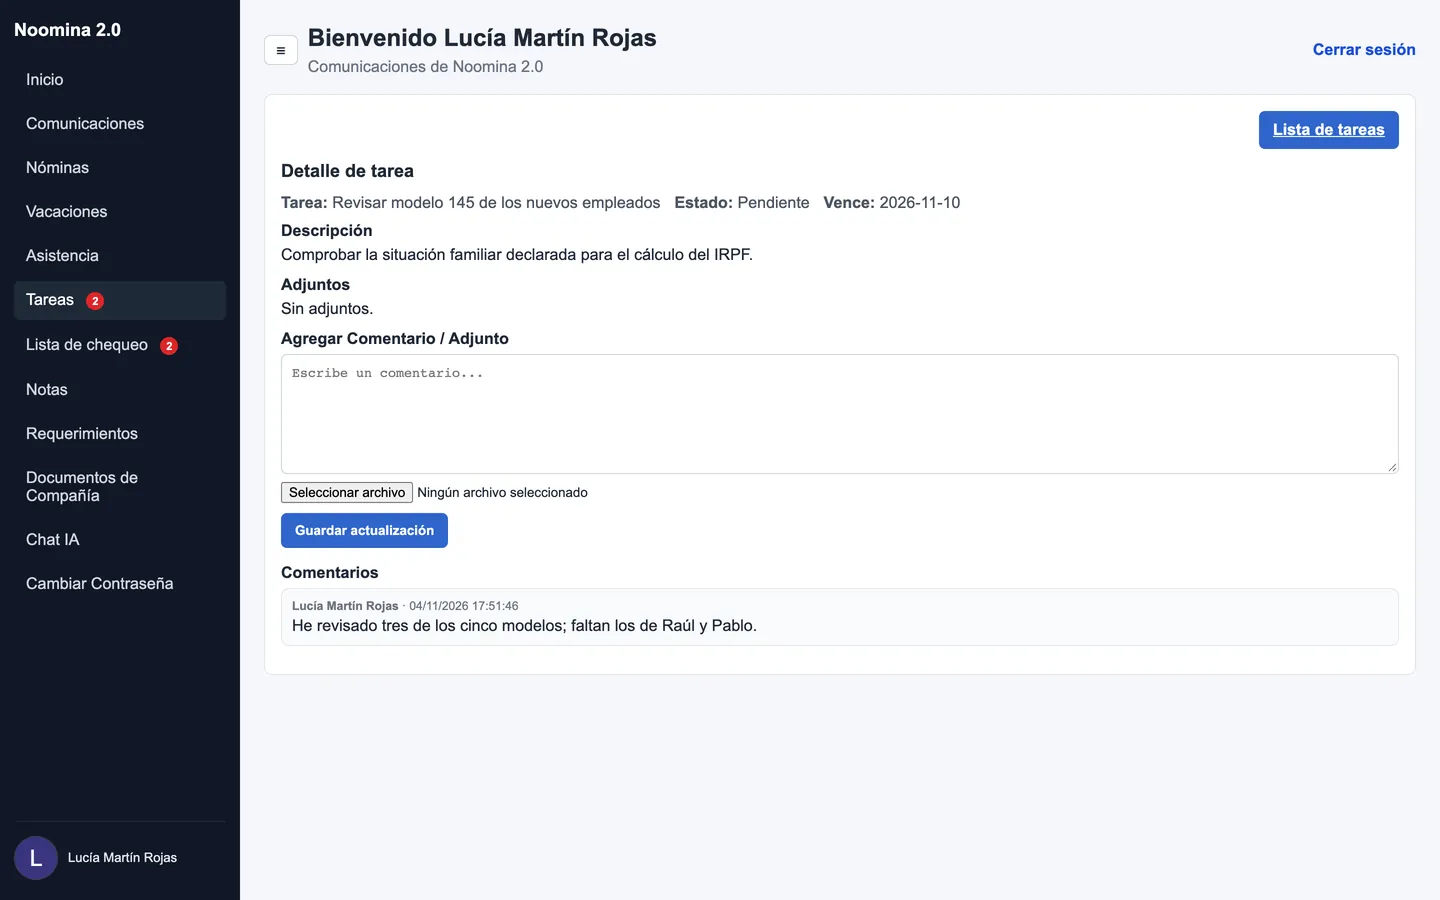
- 1«Tasks» → «View Detail»: the employee reads the description and attachments, writes a comment or uploads a file with «Save Update» and clicks «Mark Completed» when done.
- 2«Checklist» → «Open Checklist»: they see the progress and mark each pending task as completed.
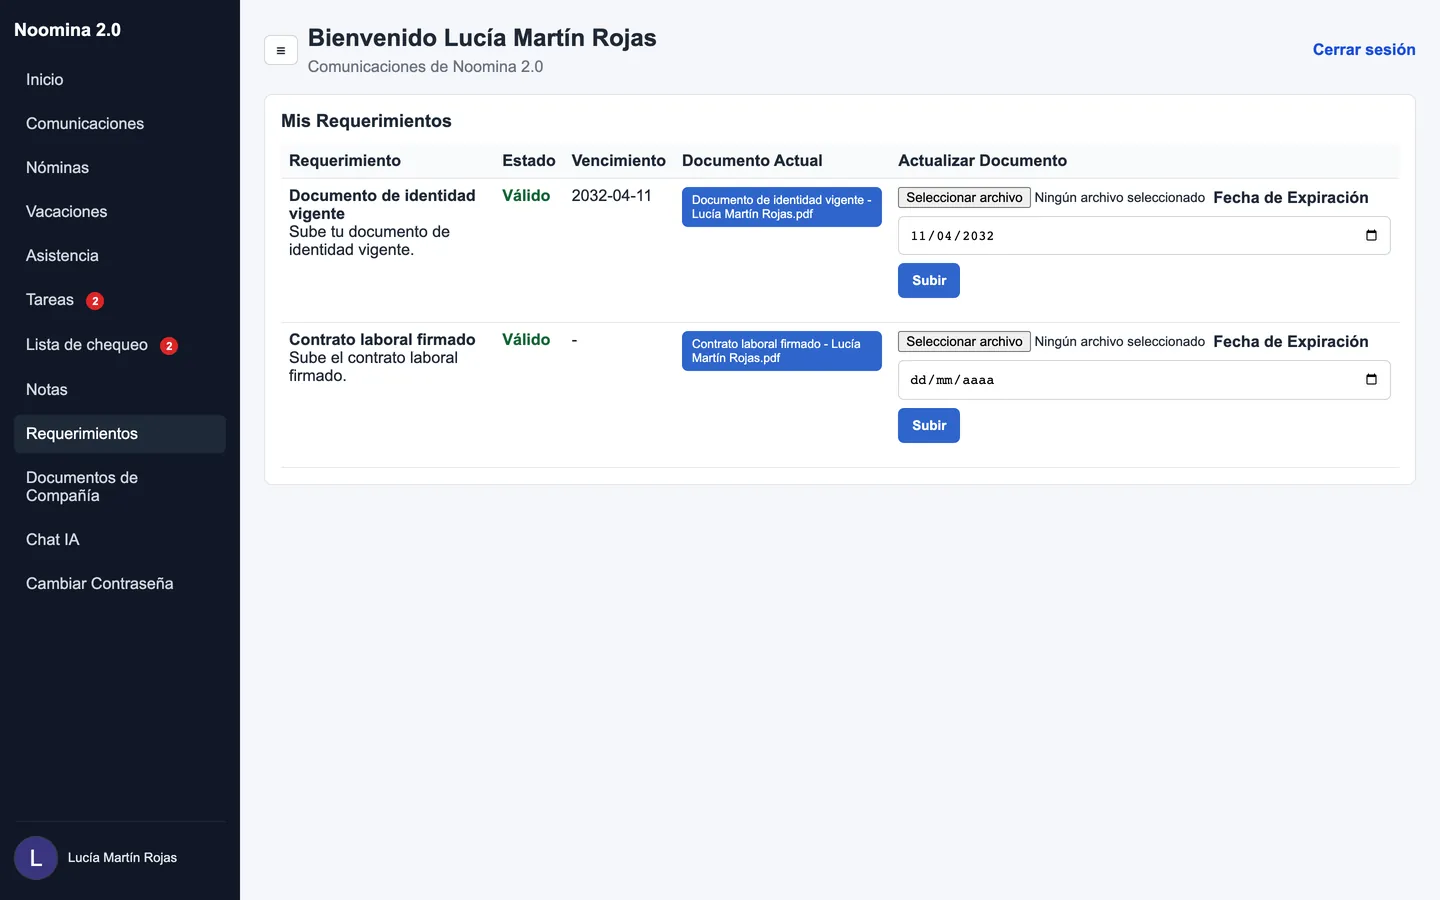
- 3«Requirements»: pending and expired ones are highlighted in red. Choose the file, the expiration date and click «Upload»; the requirement becomes Valid and HR sees it in the backend.
- 4«AI Chat»: type a payroll or HR question and click «Send». The assistant answers in the language of the question and the conversation is saved (it needs the ChatGPT key).